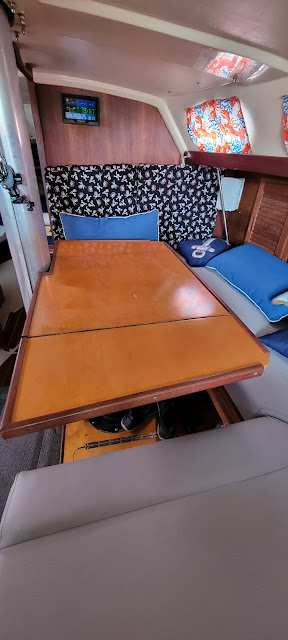
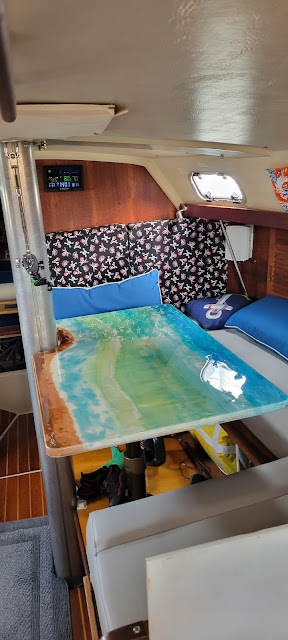
New DIY Cabin Table
 |
| Before |
 |
| After |
 |
| Another Project completed. |
Our sailing experience on a 1987 Catalina 34 which we named 'Eximius' which google showed as the Latin translation for 'Special' We hope that our posts will help others looking to take their boat beyond the local waters as well as provide entertaining reading. I'm a Brit, so my view of entertaining may not match yours ;) See you on the water. The Journey Starts Here Paul
 |
| Before |
 |
| After |
 |
| Another Project completed. |
| Overview of the Orion Charger |

 |
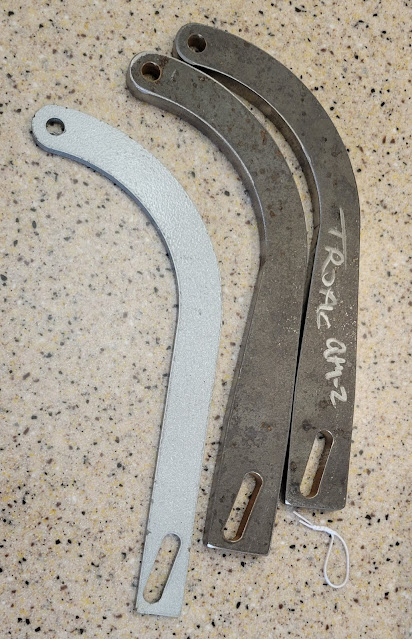
| The Gray arm is the original |
 |
| The Original is laying on top of the new arm |
 |
| L-to-R Original, Primed, Finished |
Our existing External Regulator is a backup unit from when the Zantrex Power Management System was installed, now replaced with our Victron Power Management System. The old external regulator does not have the features to protect our Balmar 6 series 100A Alternator nor does it consider the battery temperature nor the Battery Voltage. The Balmar MAX MC-618 does ( The H indicated that it is supplied with an electrical harness.)
I purchased the regulator from PKYS online and was surprised that it's cost was competitive with Amazon and it's delivery was at least as good, it arrived early. When it arrived, I thought I had the wrong item. I sent an email to PKYS explaining that they had sent the wrong item.
But!!! As you can see from the picture above, it's identified as a MAX Charge MC-618 not as an MC-618-H, I found that the label on the underside of the regulator shows it's a MC-618-H I and sent a follow up email to PKYS apologizing for my mistake.
I read through the manual again and realized that I didn't order the two Temperature Sensors, Duh! I placed another order for them. After placing the order, I called PKYS just to make sure they didn't react to my first email regarding the wrong item. They actually picked up the phone and responded to my query. Very helpful. The order for the two temp sensors arrived a day earlier than expected ( ordered Monday arrived Wednesday )
As I mentioned, I read the manual. It's online but I downloaded it and stored it in my 'Manuals' folder for future use. I'm going to print it to keep on board with my other manuals, just in case I'm ever out at sea and no net connection.
Ok, Onto the Installation.
My plan is to keep the existing dumb regulator as a backup, it works, just not very efficiently.
Here's the rough process:
Turns out it was the Drive belt lose again! I went to Broward Bolt and got a few of these Nord-Lock washers used to keep Turbo Units on cars & trucks from shaking lose.
I need to adjust the belt tension and lock the bolts in place with these washers.
FYI, I make a point of going to Broward Bolt as soon as I need any type of bolt, nut or washer!
1560 N Powerline Rd, Pompano Beach, FL 33069
The staff are awesome, they have never been out of stock for anything that I needed and have always been really helpful. Must admit, when I first went there a few years ago, I was expecting they would be expensive but happily surprised that their prices are very reasonable. They are not sponsoring me at all, I just feel the need to promote really good customer service. Give them a call next time you need Nuts, Bolts or Washers ( and drill bits, hole saws and two part epoxy mixes - the type in Tubes like Caulk ) (954) 960-1740
Here's the wiring diagram for this project.
OK, we're headed down to the boat in the morning, I'll try to take a bunch of pics of the install and Alternator Tensioning.
Getting better at climbing the mast, the new Ascenders from ATN work really well, especially when they are attached at the correct length from each other to suit my body length.
My Dock Neighbor, Doug, took a bunch of pics while he was lazing in his Pool and I was the local entertainment. Peggy was too busy managing the Belay Line ( safety line ) at the winch in the Cockpit.
I was wearing my Safety Harness, Bosun's Chair, tool pouches. Long sleeved top with Hoodie ( something around SPF 50 ) hard soled shoes. In my tool bags were a Cordless Drill, a bunch of lines ( for use as messengers, safety lanyards to prevent tools taking a dive, etc.) Pliers, Needle nose Pliers, Drill set, Self Amalgamating Rescue Tape, Bottle of Water, etc. etc. I probably was pulling up about 180lbs when climbing.
The good news is that it is so much easier now that I have the process down. Even Peggy noted that I reached the top a lot quicker this time and I spent much less time getting kitted out before starting the climb.
Once at the top I got to work. Step one was to remove the Silicone caulk that was covering the VHF Antenna Cable, the old Wind Transducer cable ( original from when we purchased the boat but unused as the old transducer was broken ) .
With the Silicone out of the way, next it was time to pull the old wires out of the top of the mast. The VHF antenna cable had about a foot of wire above the mast head. The Old Transducer wire only had about 2" of wire sticking out of the mast head. I tied a line to that wire, then I called Peggy on my cell phone and she started to feed the Transducer wire up through the hole at the base of the mast.
Gladly, the wires pulled up out of the top of the mast quite easily, I was able to pull about a foot of wire with a singe reach. As the wire came out, I let it dangle down from the mast. With the top of the wire secured with that line I tied earlier, the weight on the line was only about 1/2 the total weight. Once a wire was all the way out and the Messenger secured to the mast head, I dropped the wire down to the deck. To prevent freaking out Peggy, I advised her that I was doing that so that the sound of something clattering down onto the cabin top.
Next task was to make a new hole in the Mast head large enough to pass the new VHF Antenna Cable. The cable is 3/8" dia, so I drilled a 1/2" hole close to the original hole. Then I drilled between the two holes and cut out the sliver of metal (Aluminum) between them so that I could move the VHF Antenna Messenger line between the, small, original, hole and the new 1/2" hole.
Using the cell phone again, I called to Peggy to pass up the Antenna Cable and the Transducer cable. I had not wanted to carry them with me when I climbed the mast, it was another 15lbs - the Antenna cable is 90' long and the transducer cable is 82' long.
Peggy attached the rolls of wire to a spare halyard and we pulled them up to my work station 52' above the water.
I had trimmed off the outer sheath of the VHF cable before climbing the mast. I used the Rescue tape to join the messenger line to the VHF Cable and had Peggy start to pull the messenger line out of the hole at the base of the mast as I feed the Cable down into the new hole in the mast head. The first 30' went well, but it more difficult for Peggy to pull it out of the mast base.
I called my Son, he lives nearby, and left a message asking if he could call me back when he got the message as I needed some help on the boat. Next I called a sailing buddy, Atilio. He has the same model boat as Eximius and he lives just a few blocks from the Boat. Without hesitation, Atilio dropped everything ( it was Saturday ) and drove down to help.
With Atilio ( Hero ) down in the Cabin, he was able to pull the messenger line as I continued to feed the cable into the hole atop the mast head. Eventually, with a bit of push and pull at both ends, we got the connection from the Messenger line and the VHF cable out of the base of the mast. That left another 40' of cable, I could only imagine the sight of the wires & messenger lines down in the cabin.
Once the VHF cable was fed down the mast head with about 18" to go, we stopped and I attached the connector on the end of the cable to the VHF Antenna. One job down!
Atilio was ok to stay a while longer so we repeated that process with the new Wind Transducer cable. It was a lot easier, probably because it was a lot more flexible. There were a couple of places where it required a significant pull on the Messenger line, I'm guessing that it was as the messenger/wire joint was passing the rivets that hold the conduit through which the cable pass down the inside of the mast to stop them getting chafed by the mast internal halyards. So I have a slight concern that the wire it ok, we'll find out when we go back to the boat on Wednesday/Thursday (weather dependent)
The Non-skid on deck of Eximius is crying to get refinished and it's time.
Sometimes, things become a lot easier when I take the time to write out the details of the job, and that's why I'm writing this post. Of course, it might help others and that's a benefit. if you would rather read about some of our cruising antics then skip this one, but if you need to refinish your boat deck, it may be worth the read.
 |
| Port side Anchor Locker Cover |
 |
| Stbd midships deck |
After discussing the project with the guys from Catalina Yachts, I concluded that the following is a process I can handle.
As the non-skid is a diamond embossed surface and the masking tape will not affix so neatly, I anticipate that it will be easier to refinish the areas outside of the Flat Grey and Grey Non-Skid first and then refinish the Grey flat and Non-skid areas second.
Get the materials.
This is probably the difficult part of this project. I'm leaving the hardware on the deck in place but making sure that it's well masked off and any chips or hairline cracks repaired as necessary.
Step 2: Prep the Deck
The non-skid on the deck could be original, it's a diamond pattern however, the finish is badly worn due to frequent foot traffic, in some areas there appears to be roller marks. ie. Swaths of the surface color about the width of a paint roller are obvious. In other areas, the surface is actually worn away - particularly, the tops of the Anchor Locker Covers. On those covers, the underlying fiberglass strands can be seen. The good news is that the covers are solid fiberglass so there's no risk of damage below the fiberglass. The rest of the deck is in great shape, it's just that the non-skid surface is worn away.
I spoke (online chat) with guys from Jamestowndistributors.com and they were very helpful, they even had a guy that had done a technical course with Alwgrip, so my confidence in their help was high. Matthew sent me a link to the document that covers the Alwgrip application process if very granular details. (link to manual)
The preparation sounds pretty simple but the manual indicates that there's a few tests that should be done to ensure really good adhesion. (It's on Page 17), so I'll be doing that test on the worst part of the deck. I expect the job will require priming, hence the addition of the Primer to the list of materials.
 |
| Note. My MultiPlus 12/3000/120-50 120V is named 'Eximius MP3000 |
If an item in the spreadsheet is White Text on a black Background, that reflects the top item of the current Menu. In the real menu, that line also may show the current status of the display.
My display includes the Location Icon, the Connection Type and Bars and the current time.