Our sailing experience on a 1987 Catalina 34 which we named 'Eximius' which google showed as the Latin translation for 'Special'
We hope that our posts will help others looking to take their boat beyond the local waters as well as provide entertaining reading.
I'm a Brit, so my view of entertaining may not match yours ;)
See you on the water.
The Journey Starts Here
Paul
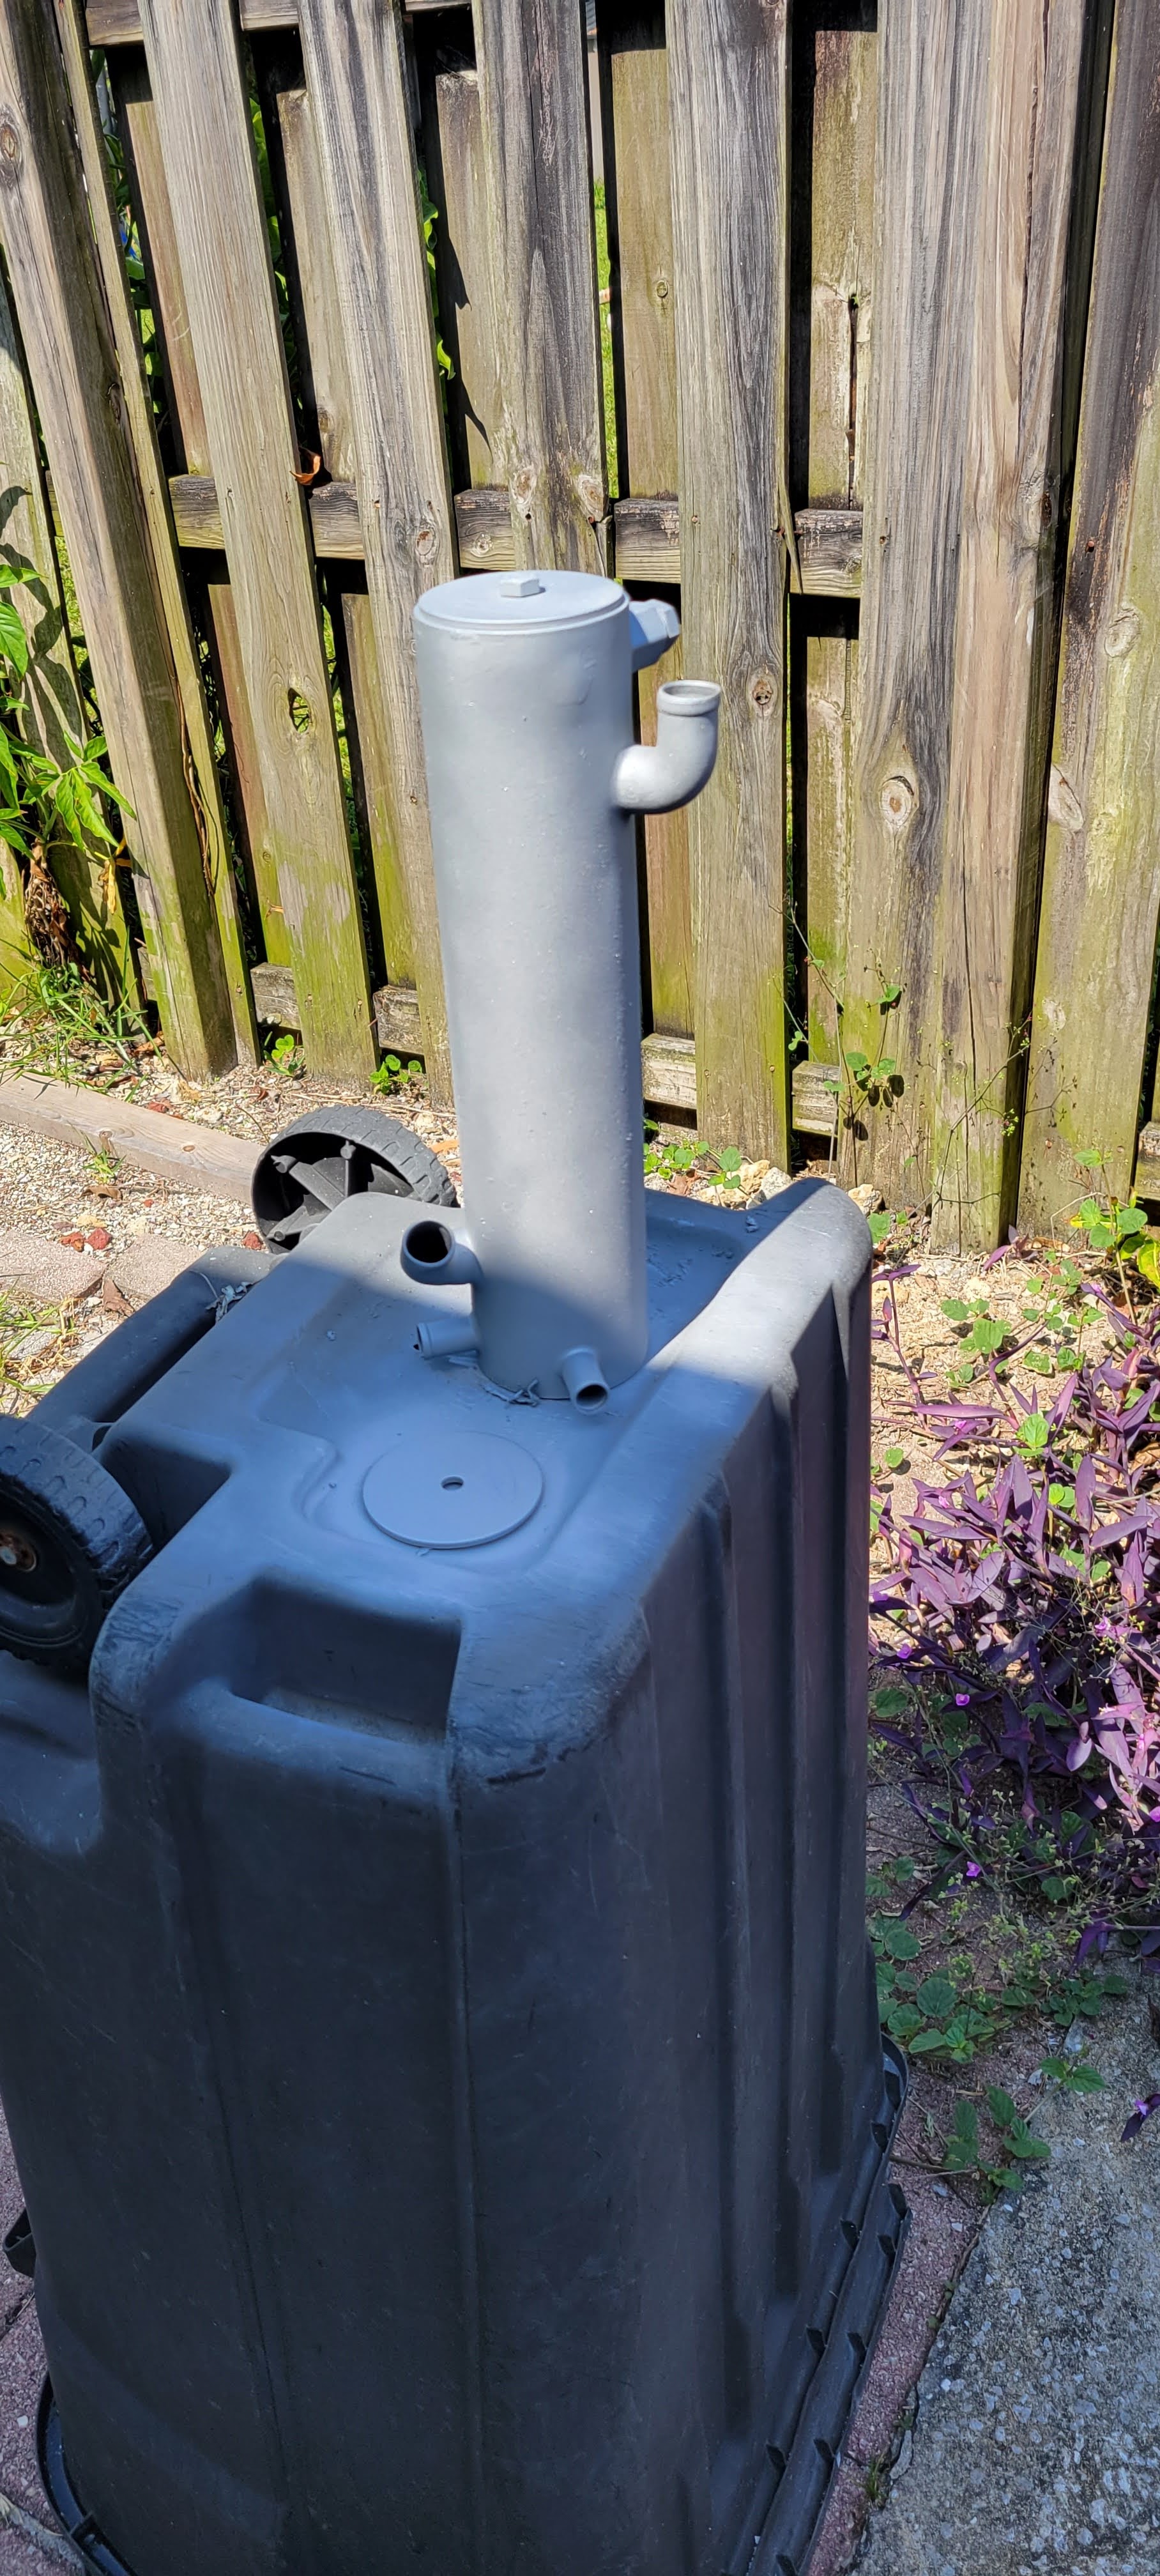
Our gWind, Wireless Transducer failed during our trip to Biscayne Bay over Memorial day weekend, I guessed that it was the Battery and ordered a replacement online. Yesterday ( June 27th 2022) it was time to replace the battery.
I took my phone with me when I climbed the mast, but sadly, it was in a pocket that I could not get to when wearing my harness and in the Bosun's chair. So the pics are some that Peggy took down on the dock.
I'm pretty sure that the Main Halyard sheave at the top of the mast needs to be replaced as neither Peggy nor Mike, club buddy that came down to help out and provide additional safety, could pull me up using the winch! So I did my usual practice of climbing the mast: Using a pair of prusik knots on two separate halyards, one tied to the Bosun's chair and safety harness the other tied to the foot straps. Using them I can sit in the chair, raise my feet and then raise the foot strap prusik knot as high as it will go (about a one foot stretch). Then I stand up in the foot straps, taking the weight off of the chair, raise it's prusik knot, sit down and repeat. If I move the seat knot up by close to 1' each pass, then it takes about 40 moves to climb the mast. In reality, it takes a lot more, probably eighty moves as some of them are only a few inches while trying to maneuver around the shrouds and especially the last couple of feet.
Once I had gotten to where the foot strap prusik knot it as high up the halyard as it can go, that's about 8" from the top of the mast, then I can stand up and my shoulders are above the top of the mast and I can reach pretty well everything up there.
This time the plan was to climb the mast and replace the gWind Transducer's battery. The transducer is held in place by a clever bracket and nut system. Simply pull off the clip that stops the nut from unscrewing, unscrew the nut, pull the whole transducer arm forwards and slightly upwards. It takes less than an minute to release the Transducer.
With the Transducer on my lap in the chair, I used a #1 Philips head screwdriver to undo the small screw that holds the battery cover in place. It was easy to lift off the cover, unplug the old battery, plug in the new one and replace the cover. The insides of the Transducer looked pristine so no apparent water ingress which is a problem with the heavy rains that we get here in South Florida.
I did note that the Solar Panel on the top side of the Transducer was 100% opaque, completely white! I'm guessing that means that the Transducer is not going to charge the battery. We have had wind data on our Nav system on every night trip, so the battery is just there to cover the times when there's no solar power and normally, rechargeable batteries are at least partially charged when new.
Less than a minute to reinstall the Transducer and call down to the team ( Mike & Peggy ) down below and ask them to test the system.
Sadly, that didn't go well :(
With the Nav instruments powered up, the display lit up showing that it was powered but the data came on but only for a few moments. It showed wind angle info ( True Wind and Apparent wind Directions) but no wind speed, after a few moments the data disappeared. If we reset the Nav instruments, then it would pretty much repeat that scenario.
I've been in the Bosun's chair I was ready to get back to deck level. Going down was a lot easier, I Mike & Peggy used the winch to haul the main halyard and take all of the weight and I eased the two prusik knots, then they eased the winch and as I moved down, I just moved the prusik knots with me.
They stopped lowering me when my feet were able to get on the spreaders. From there I freed the line for the lazy jacks that was stuck between the sheave and cheeks of the block attached the mast above the spreads. I need to replace that block ('blocks' as there is one on each side of the mast )but it's free right now so we can adjust the lazy jacks.
So, my thoughts. If the solar power is zero, then the battery will run down within a day or so, but if there's any solar power getting into the battery, then it should charge up within a day or too also.
If it's not a Solar/Battery issue, then it's the gWind and looking at the reviews on the web, that's a strong likely hood. Under normal conditions, it's not unusual for the wind data to just disappear for a few minutes and it normally comes back if we reboot the system which we only try if the data does not return within about 5 minutes.
Options:
Check it today and all may be well.
Replace the Transducer with another gWind Wireless = $750+tax
Replace the Transducer with a wired gWind = $650
It's nuts that the wireless Transducer is so much more than the wired unit, as the wired unit has so much more in the Kit
Using the wired unit brings me back to why we used the Wireless model originally: Running a new wire up the mast is a significant job.
Other things to consider.
If I do end up replacing the Transducer, and if I go the Wired route, then I might as well replace the VHF antenna coaxial at the same time, the existing coax has a much higher power loss than a decent cable and that would improve our VHF communication range both for Transmission and Reception.
Ok, first things first. Go down to the boat and check out the status.
A day later:
The system is still not delivering data from the Transducer.
I spent a good while on a text chat session with Garmin this morning. From that chat I conclude the following:
#1 If the transducer is the older generation then I'm out of luck and will have to purchase a new item that's $750 plus tax.
#2 If the transducer is a new generation, then I should be able to get an out of warranty exchange, that's $350
#3 If I replace the Wireless Transducer with a Wired unit, I should be able to connect it to the GND 10 and disconnect the no longer needed WSI Box (the Wireless Receiver).
The Wired Transducer will cost about $650.
I'm leaning towards the Wired Transducer and replacing the VHF Coax at the same time.
Time to get busy and earn some boat bucks.
See you on the water, even if I don't know the wind speed & direction.
The Zinc Anode for the Universal M25-XP heat exchanger is in two parts. The Zinc and the Cap.
There must not be any insulation between the zinc and the Cap nor between the Cap and the body of the Heat Exchanger. The whole idea is to allow the zinc to corrode rather than the body or tubes of the heat Exchanger.
The problem is that the screw thread of the Zinc corrodes with the metal (Brass?) of the Cap. As the Zinc corrodes during it's stay inside of the Heat Exchanger, the zinc is washed away in the flow of the salt water that passes through the Heat Exchanger. So when it's time for the zinc to be replaced, it's in a pretty weak state and often breaks off when trying to remove it from the Cap. <<<< Just like this.
I know, change it more often. Will do!
I tried drilling the zinc out, gave up pretty quick.
Then I tried Barnacle Buster !!!! Wow!
As it happens, I have a spare Zinc Cap from a previous change out, so I'm seeing what happens.
Here's what it looks like after 48 hours
The remnants of the zinc have gone and the threads are clean.
It looks kinda grotty, but in fact is is extremely clear of the debris from the old zinc
The Cap's end gives a clue.
By the way, I used a pair of stainless steel tweezers to pick the Cap out of the Barnacle Buster, the tips of the tweezers have that similar black color now.
This pic shows the Cap after literally 2 minutes of wire brushing using a brass wire brush.
This is after rinsing and drying.
I have no issues with using this as the Cap during a future heat exchanger zinc change.
The stores sell the zincs either with or without the Caps, I have a couple of spare zincs without the caps.
The alternator on our Diesel Engine has moved about due to vibration (hey, it's a 3 pot Diesel) and has broken the support arm twice.
I purchased a new 10mm x 100 mm bolt and a Nylock nut to replace the old one just in case some of the slack in the Alternator mounting was due to a worn bolt.
It also occurred to me that the mounting bracket spacer might not be suitable for the Alternator ( which we replaced a few years ago). My calipers were not accurate enough to measure the gap between the Spacer and the Alternator Ear (I think that's what they call it), it would really require a Micrometer and I don't have one ( YET! )
On Amazon I found some 10mm internal diameter shims, 10 each of 0.1mm, 0.2mm, 0.3mm and 0.5mm and purchased those.
By trial and error process, I figured that the existing spacer between the Alternator support brackets and the Alternator Ear had a 1.2mm gap.
Using two 0.5mm shims and one 0.2mm shim the alternator
With those 3 shims in place, I was amazed at how batter the alternator was supported by the brackets.
It took about 10 minutes to fiddle the shims on to bolt after it passed through the foremost support bracket, then get the Spacer onto the bolt, there is obviously almost no gap now, and finally the bolt into the aftmost support bracket. With the Nylock in place but barely tight, the alternator felt rock solid in the mounting.
After adjusting the drive belt tension and securing all 3 of the bolts that hold the alternator in place, it feels total as one with the engine. Solid!
With everything tightened up, Peggy started the engine. Not a hint of a squeal when she shifted the rpm up to cruising speed and no movement of the alternator.
I'm hoping we have cured that issue of vibrating alternator and subsequent breakage of the tension support arm.
I hear the waves beating against the bow! See you on the Water.
As the boat has been out of action for a couple of weeks while I installed the new Victron Electrical Power Management System (Here's a link) I decided now was a good time to replace the engine's Heat Exchanger Zinc.
On our Mk1 Catalina 34, I can reach the heat exchanger by just leaning over the top of the engine as long as I don't mind scratching up my arms in the process. The Zinc is located on the underside of the exchanger near the Port side end of it.
Having replaced the zinc previously by accessing the back of the engine from underneath the Aft Cabin floor, which involves some serious Boat Yoga, and, as we use the aft cabin for storage - lots of storage, the option to change the zinc out from leaning over the engine is really appreciated.
I use a Puppy Pad to cover the engine, then reach down the port side with a wrench to unscrew the zinc, pretty easy, especially as I'm a skinny guy.
However, putting in the new zinc was not so easy, it just felt like I was cross threading the zinc. So I made the decision to pull the heat exchanger out and do a service while checking why the new Zinc would not fit.
To remove the heat exchanger on the M25-XP there are 4 hoses and two large hose clamps that are used to secure the exchanger to the mounting plate attached to the back of the engine. I had replaced the hoses a couple of years ago, so they came off pretty easy. The two clamps holding the exchanger in place were easy to release and in less than 15 minutes I got the whole thing out. I did put a bung in the port side coolant pipe when I removed that to prevent the coolant just emptying into the bilge. Successfully, I kept the loss of coolant to a couple of cups and I mopped that up with paper towels.
My initial thought was that there might be a couple of leaks around the nipples of the heat exchanger, the green patches are at least surface corrosion.
Decision made, take it home and clean it up, detailed inspection and do what is needed to get the Zinc installed.
At home in my garage, I could see that the thread on the nipple which hoses the zinc was pretty crudded up. Using a Battery Wire Brush to clean out the nipple was not very effective. Time for some Barnacle Buster.
It was easy to remove the end caps and the rubber seals looked in good condition ( thankfully, but they are available on Catalina Direct - it just delays the project while they are shipped )
Inspecting the inner tubing, I could see that it was about 20% occluded ( my wife was a nurse for 40 years) and 20% is not so bad, but they needed cleaning.
I made up a mixture of 4 parts water to 1 part Barnacle Buster, about 2 gallons all told, put that into a narrow bucket and let the heat exchanger soak for about an hour. The grot that came out was amazing, the mixture was a dark brown after removing the exchanger. I rinsed it thoroughly then wire brushed anywhere that looked like it needed repainting.
All of the corrosion came off and the braised joints all looked pristine. The Zinc nipple thread was now spotless and I was able to screw in the zinc a total of 4 turns. I'm sure the thread is tapered. But it looks good.
After a good cleaning with fresh water and a thorough wipe down with Acetone, I gave it a couple of coats of spray primer (for high heat applications) and let it dry overnight.
Looks pretty good, ready for the 1st coat of top paint.
1st coat of top coat. It's about the same color as the original, needs about 30mins between coats.
Almost a shame that when installed, it will not be visible.
Plan is to apply the 2nd top coat this morning and put it all together. Tomorrow, we'll both go down to the boat and reinstall it.
After connecting the coolant hoses, we need to 'Burp' the system to eradicate any air in the system. The method is to top up the coolant reservoir and close the cap, then open the Pet Valve on top of the Thermostat housing, run the engine at above idle until air stops coming out of the Pet valve. Close it up and re-top off the coolant tank.
That's the plan! here's hoping there's no leaks, especially from the Zinc Nipple.
110v Disconnect Switch and Reverse Polarity Testing on our Boat
When we purchased our 1087 Catalina 34 in 2015, I was blissfully ignorant about the boat's 110v electrical system. Since then I have learned a lot, hopefully the changes I have made and the changes I plan to make are a whole lot better than what we started with.
The boat had a Reverse Polarity indicator on the Main Electrical Control Panel and it had a 'Test Lamp' switch. Whenever we went to an unfamiliar dock and plugged into the their shore power, I would observe the status of the Reverse Polarity Lamp, it never lit, which meant we were not connected to a reverse polarity 110v Pedestal, I would operate the test switch to check that the lamp was working. It always worked.
The problem was ( as I found out this past week) that the lamp was not connected for reverse polarity indication, just to illuminate when the test switch is pressed.
During my design for the new Electrical Management System, I included a reliable Reverse Polarity Indicator and Test.
The Switch is a On-Off-(On) switch, it's normally Off, can be switched to the On position which would test for reverse Polarity and it can be momentarily switched to the Test Position which would check that the lamp is serviceable.
All of this is installed inside the 'Shore Power Disconnect Switch' box mounted under the Nav Table a few inches from the Victron Multiplus 12-3000-120
The reason for moving the disconnect to the Input of the Inverter Charger rather than the output is a safety issue.
With this setup, we can move the disconnect switch to the off position, connect the boat to the Shore Power and confirm that power is available as shown by the Green Shore Power Available Lamp. Then operate the Polarity test, in the On position if the lamp lights, then the polarity is reversed, if the lamp does not light, then it should be tested by operating the Momentary On Switch which connects the lamp to the Live and Neutral lines, if the lamp lights, then we're good, if the lamp does not light, then it's a dead lamp. In that case we'll have to test the pedestal with a Multi meter before accepting the power is ok and then closing the disconnect switch.
The procedure for attaching shore power is:
Select Off at the Disconnect Switch
Connect the shore power cable to the boat
Connect the shore power cable to the Pedestal
Check for reverse polarity.
If ok, then Select On at the Disconnect Switch.
The process for disconnecting Shore power is:
Select Off at the Disconnect Switch
Disconnect the Shore power cable from the Pedestal
We have power! The last few steps in installing the Victron Multiplus 12v 3000w 120v Inverter Charger were completed yesterday and we were able to reconnect the Boat's batteries.
The last item of the install was connecting the Battery Temperature sensor to the -ve House battery terminal and connecting the Shunt power and the Main DC power line to the +ve terminal of the House Bank. With that done, the Victron started showing signs of life. The Cerbo GX showed that the Blue Tooth link was active. The GX Touch 50 showed that the system was starting up. No sparks, no smoke, no smell of anything burning, things were looking good.
We quickly checked that all of the boat's electrical systems were working, I had done a lot of work behind the Main Electrical Distribution/Control panel, I had looked closely at every connection on each of the DC and AC Circuit breakers, they all looked secure. Of course, there are several wires that have no attachment left over from previous work by others before me, they are on my list of additional projects on the Electrical system.
Today we installed the USB Charging station (to the left of the GX Touch 50 ) and completed the securing of the panels.
The long term plan is to replace all three of those panels with just two, one for the DC Power Selector and the other, an 'L" shape panel, to hold the GX Touch, the USB power and the AC / DC selector panel.
That's another big project, but one that is quite a way along the planning stage. Probably going to keep the existing selector panel but make it part of the larger panel.
Of course we had low level panic when the GX Touch 50 going dark when I changed the Multiplus switch from Off to On !! Returned the switch to Off, nothing. As the Touch 50 is powered from the Cerbo GX I figured I would reboot the Cerbo. Pulled the power cord out (it's on the lower edge of the Cerbo) gave it a coffee break, plugged it back in and a few seconds later the GX Touch rebooted.
Continuing the review of the state of the system, a few minutes later the GX Touch went dark again. Peggy suggested that it might be a screen saver! Duh! Just touching the screen woke it up. I guess that's one reason they call it a 'Touch' screen.
We turned on the Solar Power and a few seconds later, the display showed that the battery was being charged - Woo Hoo!
Next I connected the Shore power. First we checked that the new Shore Power Disconnect switch was in the Off position and that the 'Shore Power Available' lamp was illuminated. Good so far. The Reverse Polarity lamp was not lit, I checked the lamp worked by flipping the Momentary switch and it worked fine. So power was available and the correct polarity. I flipped the Disconnect switch and almost immediately the GX Touch showed we had power to the charger and were charging the Batteries. It automatically diverted the Solar Power. Seeing the display indicating the flow of power from the Charger to the Batteries is pretty cool, definitely much clearer than the simple digital display of the old Heart Interface Control panel.
Time to check the Inverter. I plugged a fan into one of the 110v outlets, switched the outlets on ( see the left side of the power control panel in the pic above) the fan ran fine. Then I switched the Disconnect switch to off to remove the shore power and the Inverter took over without any delay.
So far we're looking good.
The GX Touch ( I'll call it the system display ) showed that there was no AC In power, which was not the case as the Charger and the Fan obviously had AC Power. I found in the settings an option to show which AC power would be displayed ( Shore Power, Generator, PV alternator) so I set it to Shore Power and when back at the system display page, it now showed the shore power voltage and the power in.
The T-Mobile Sim card had arrived yesterday, we plugged it in and in a few seconds the GX 4G LTE Modem showed it was connected to the internet. I setup my laptop to my phone's HotSpot and visited the Victron VRM added the ID of the modem and it connected right away and within a couple of seconds, we ( Peggy was with me) could see the system on the internet.
I noticed that the Max AC current was set at 50Amps, but our shore power is only rated for a 30Amp power source. On the system display I found the setting for the Max power draw and changed that to 30amps, rebooted the display and, again, a few seconds later the Internet VRM showed we were now limited to 30amps.
During the test of the AC In, we had the Air Conditioning turned on, and the system display showed our power consumption as well as the Battery Charging. Total draw was 850 watts.
Things are looking good. I do need to figure out how to change the battery charging parameters, the Default are for AGM or FLA, but I want to make sure the parameters are within specs for our batteries.
Other than a few settings changes, I think we have completed the system upgrade. I'll post some more pics and the wiring diagram of the Disconnect switch box ( thanks to Amazon the parts were easy to obtain ) My primary reason for that switch box was to allow disconnecting the shore power without having to hop out of the cabin and jump ashore to flip the circuit breaker on the power pedestal, just incase anything had a run away in the electrical system.
So our procedure for applying Shore power is:
Ensure the Disconnect switch is in the Off position
Connect the shore power cable to the SmartPlug on the Boat
Connect the shore power cable to the Shore Pedestal
Down in the cabin check that the Green Shore Power Available lamp on the disconnect box is on.
Flip the 'Test Reverse Polarity Lamp" switch to make sure that lamp is working
Switch the Disconnect to On.
Check that the Multiplus is in the On or Charger Only position as needed.
Before heading home there was time to replace the Engine Heat Exchanger Zinc, the old one came out and definitely needed replacement, it's been about 9 months since the last change out. But for the life of me I could not get the new Zinc to screw in. So tomorrow I'm removing the Heat Exchanger to do a complete service and put in the new Zinc. A 20 minute job, right :)
Thanks for reading, I'll post some more pictures of the Victron Install in the next few days.
I expected to have everything installed and ready to power up today, even took my laptop to the boat anticipating that we might turn the system on, but I did leave it in the truck as I wasn't totally convinced that all of the last few things would get done before rain stopped play. The rain didn't, but the heat did.
First thing today was to complete the new Ground wire for the Victron Multiplus to the Ground terminal block on the Port side engine support frame. I had run the wire on Saturday, glad that it was 15' long as if I had just purchased the guestimated length of 12' it would have been a couple of feet too short.
With the cable in place, I crimped a ring terminal to the Multiplus end of the cable using my new Hydraulic crimper. Works great, worth the $99 (including 2 years warranty)
Then it was a bit of a struggle to get the other end of the cable right up to the terminal block. The cable was easy to get to the Bathroom cabinet right next to the Depth/Speed transduce, but that last couple of feet was the challenge. With the cabin steps removed, we had easy access, well, easy for a skinny guy like me. With the cable fed around the back of the engine bay and in through an existing hole in the bulkhead, I was able to crimp a terminal on that end. To install the terminal on the terminal block I had to use every socket extension that I had in order to reach down to the terminal nut. Got it done.
The ground cable fully installed except for the looming of the cable, that would have to wait till the last few cables are installed so that they can all be loomed at the same time.
Next it was time for the Start Battery Trickle charger cable, that goes from the Multiplus to the Start Battery. The two end points are maybe 18" apart, but the cable is about 10 feet long as it around several corners/holes. But no big deal, Peggy was a great help in running the cable and I was able to crimp the Multiplus terminal end ( spade connection ) with my regular crimping pliers, but the other end required a larger lug and so the Hydraulic crimper came out again.
The next job was to make up the new Disconnect box, the first one that I purchased was just too small to allow the cables to fit inside and reach all of the switch terminals. It took about a half hour to drill the top for the Circuit Breaker Switches, the Diode indicator lamps and the Test Switch. Once that was done, it was simply a job of mounting it to the bulkhead under the Nav Table, running the wires through the cable clams and connecting them to the Circuit breakers and the test switch. That went well, I checked that the top would fit into the base of the box and that there was sufficient slack in the cables to allow them to bend and fit within the box. They did, Great! Now, just check tighten all of the terminal screws.
GRRRRRRRRRRRRRRR! The 1st screw that I 'Checked' broke the switch! Grrrr! My fault, too much torque on the driver. But the plastic cover of the switch broke and that's it. Have to replace it.
Without hesitation, I ordered a 2nd switch from Amazon, it should arrive overnight.
With everything else done, it was time to make it look neat and tidy. I applied a couple of dozen zip ties, securing the wires, taking the strain, cutting of the surplus zips.
It was already gone 1pm and the high humidity and the early Summer heat was basically unbearable. So we stowed the tools, picked up all the bits that were laying about. Packed our bag and headed out of the cabin. We made it to the truck before it began to rain and stayed dry. The rain did wash the truck on our way home, but all gone by the time we pulled into our driveway.
So we nearly made it today. The plan is to go back and finish it off tomorrow, Tuesday, but that depends upon the new circuit breaker arriving overnight - turns out that is between 7am and 11am Tuesday.
Oh well, there's plenty to do at home, mow the lawn, paint the facia, bake some desserts.
If the circuit breaker doesn't arrive early enough tomorrow, then we'll head down early on Wednesday. I should definitely finish the install and should be able to reconnect the batteries and shore power.
Wish me luck. But I'll be checking everything before we turn it on.
Braving another hot day down at the boat, I made a lot of progress.
It was sweltering today! Even with the portable cabin fan running full throttle, it was only just bearable, the fan was basically blowing hot air.
On the up side a couple of successes. Completed the wiring of the Multiplus to the new Disconnect Box, mounted the Disconnect box to the bulkhead and tidied all of the wire - cable management - so the work area looks much better. Also completed the wiring from the Multiplus to the Electrical Distribution Panel, that was fun, especially the ground connection that is to a terminal block just beyond arms length when leaning over the Nav Table. but I got it done.
Made a call to eMarine about connecting the Cerbo GX and the GX 4G LTE modem directly to the spare + & - studs inside the Multiplus, they confirmed it was not only OK but quite a few installers have done that as the Cerbo GX is often placed pretty close to the Multiplus. I also asked about the provision of suitable wire for the grounding of the Multiplus, they have it and I'm picking it up in the morning.
So after a very busy morning, here's the list of wiring to be done tomorrow.
Install new Ground Wire from the Stud on the underside of the Multiplus to the Grounding Terminal Block in the engine bay. This will involve using a wire fish/snake to reach from inside the Bathroom cabinet up to the electrical panel area where I drilled a new access hole. The wire will be #2AWG
Install new Trickle charging cable from the Multiplus to the Start Battery - the old cable was the wrong AWG and it was also household wiring! The new wire will be #10AWG Red Stranded tinned copper wire.
Install the new Reverse polarity lamp test switch in the Disconnect bod. I found out today that the old Reverse Polarity lamp test switch was incorrectly wired and it only provided power to the lamp when the switch was depressed, when not depressed, the lamp was not provided any power so it would never light! Grrrrr.
Connect the Temperature sensor to the House Battery bank
Connect the Smart shunt power supply wire to the House Battery bank
Connect the Main House Battery wire to the battery bank
At that time the boat's electrical system should be alive and happy - I'm deliberately not saying 'humming or 'kicking' for obvious reasons.
The last part of the install - not counting the update of the system firmware and the activation of the GX 4G LTE Modem and it's connection to the internet, will be the configuration of the system. That's when the fun starts. I'm looking forward to determining the State of Charge of the Batteries, monitoring the power input from the solar system and the, long overdue, equalization of the House Battery Bank.
But I'm not reaching to far to soon. I'm guessing the last part of the puzzle will not arrive until Monday - the new T-Mobile Sim Card.
Ok, working on the list tomorrow - Friday then I'm taking a day off on Saturday - actually going sailing on my buddy's Catamaran - Lady Gray.
Before we start work on the Old Power Management System removal in order to install the new Victron Power Management System, we have to make the boat safe.
Day 1 was to prep the boat so that the bilge pump would still have power but the rest of the system would not. That was pretty straight forward. The bilge pump system is wired directly to the +ve of the house batteries. So disconnecting the main battery cable does not disconnect the bilge pump.
The rest of day one was planned to be for removing all of the old equipment that is associated to the Freedom 20 inverter/charger and the DC Management system. That went well, and I was able to pull all of the old electrical part of the system by the end of the day.
It's nearly Summer here in South Florida, so it's only reasonable to work on the boat without Air conditioning for a few hours, I managed 4 hours for day 1.
Day 2 was for removing the wiring. Just as well, I found a bunch of wires that were not suitable for reusing despite that being the plan. My rule of 'If it doesn't look right then rip it out' came to the front and I removed all of the system interconnect wires as well as the 110v system wires that were too short to fit the location of the new Victron Multiplus 3000 Inverter Charger. So that completed day 2. But I finished getting that done and still had some energy left to continue. So I started on the list for Day 3 which involved installing the physical components of the new system. I was able to install the new Victron Smart Shunt.
Day 3 and I continued with the installation of the equipment. That included the Initial fit of the Multiplus. The install of the GX Touch display/control panel was a bit more involved, I had to make a new mounting panel as the hole in the old one where the Heart Link 2000R control panel was installed was too big to allow the new GX touch to fit. I went to Lowes and they cut a piece of plywood that was an almost perfect fit for the size, all I needed to do was drill a few holes in it, sand it smooth and apply a couple of coats of Varnish.
Day 4, time to continue installing the replacement wiring. This was the most challenging part. Luckily, Peggy came down to the boat with me and helped pull the new 110v Shore power cable from the dreaded Cockpit port side locker, through the bulkhead and into the bathroom. Then it passes through the bathroom cabinet, through another bulkhead and into the enclosed shelving above the Nav Table.
I decided to route the new cables using a shorter route than the originals. That involved drilling a hole in the liner below the Nav Table, that was easy, and then another hole in the shelf behind the electrical control panel. This is a much better route for those cables and it provides a neat route for some of the other cables.
Day 5, but now I'm behind schedule, nothing to worry about, but getting it done right is better than getting done quick. It was Wednesday, and the outside temperature is in the mid 90º's That Fahrenheit.
So I cut back on my time on the boat and updated the plans. But really good progress today. The Multiplus is installed and has the DC as well as the 110v wiring connected. The Cerbo GX is installed and wired except for the power connection, same with the 4G LTE Modem.
Ok, waiting for a few more items for the project. Switches, LED Lights, Sim Card. They are due Friday.
So right now I'm pretty happy with the progress. I do have to get some #10 AWG Red Tinned Copper stranded wire for the Start Battery to Multiplus Trickle Charge connection and #1/.0 AWG Green wire for the Earthing stud connection to the Engine's Ground connection bus bar.
I'm actually going sailing on my buddy's boat on Saturday, hopefully I'll get a lot more done before then.
So it's about a week before we might get this all done. Just as well that I enjoy this stuff.
The Plan: Sail down to Billy's Point in Biscayne Bay and meet up with some of the HISC Club member's boats over the Memorial Day Weekend returning on Monday/Tuesday. And have fun doing it.
We had loaded the boat with bedding, food, fuel, water, wine, Rum and Whiskey. We were ready for this trip and the forecast was looking good, any bad weather was expected to stay North of Port St. Lucie.
We started the day early, up at 5am, breakfast of Cereal & Toast, by 7am, we had the diesel engine running and prepared all of the lines to leave the dock. The morning weather report was for very little wind from the South, so going outside on the Ocean would have been a day of motoring with little to no wind. It was looking better to head down to Miami on the ICW.
In preparation for the trip with the option to go down the ditch, I had printed out a list of all the ICW bridges between Port Everglades and the Port of Miami. The list included the bridge names, distance from the previous bridge and it's opening times. The list was at the ready at the helm. So the decision was made to go down on the inside ( sailors down here refer to the ICW as the ditch, or 'the inside' rather than the Ocean route )
The New River bridges close down for the morning rush hour from 7:30am until 9am, so our plan was to leave the dock around 6:15am which would mean that we would get out of the canal within two hours of high tide.
We heard Chris and Kelli on Summer wind call for the Hillsboro Inlet Bridge opening, seems they were going on the outside, we were already down south of Port Everglades, it would be interesting to see how our progress towards Biscayne Bay differed. Later we heard Summer wind call for the Dania Beach Bridge to open, so we figured they had decided to come inside at Port Everglades and continue down the inside. Summer wind is a Catalina 36 and has a larger engine than Eximius, so I expected them to catch up with us by the time we got to Biscayne Bay.
All of the bridges opened as expected except for the Venetian Isle (West) bridge. Our GPS showed our arrival time at the bridge to be at 12:02 which would typically be as it completed it's opining. I called the bridge tender requesting the bridge opening. ( they are not required to open on a scheduled opening time if no vessel has requested it ). At 11:58am, we could see that the bridge was already open. Bridges rarely open early - normally that would be because of a commercial tow or tug or it could be an emergency vessel. In this case it was a Miami Fire Boat, I'm sure nobody would have any issues with the bridge opening early, but I had issues with the fact that the bridge tender closed the bridge before 12:00, noon, instead of remaining open to allow us to pass. We arrived, as expected at 12:02 and the bridge would normally be open fully ( the Bridge tenders routinely remind vessels to stay outside of the 'fenders' until the bridge is fully open.)
So we lost a half hour doing doughnuts on the North side of the bridge, not an easy task as the number of small vessels in the area. That was the third bridge that we missed the opening, due to waterway traffic or just being unable to make the next bridge opening.
Once past Venetian, it was plain motoring past Miami down to the Rickenbacker Causeway bridge.
We did get a good view of the The Centinela del Río, (The River Sentry) by Cuban Manuel Carbonell
Just before the bridge, over to the East is the Miami Marina Stadium anchorage. We could see it was quite busy and more boats were heading East towards it. Just in case Affection was still there as they planned, we called them on #68, #16 and #9 but no reply, so we guessed they were already on their way to Billy's Point. We could hear Summer Wind catching up to us when they called the bridges which we had already passed.
Once past the River Sentry, we followed the ICW channel down towards Rickenbacker Causeway bridge
Just before the Rickenbacker bridge, over to the East is the Miami Marina Stadium anchorage. We could see it was quite busy and more boats were heading East towards it. Just in case Affection was still there as they planned, we called them on #68, #16 and #9 but no reply, so we guessed they were already on their way to Billy's Point. We could hear Summer Wind catching up to us when they called the bridges which we had already passed.
Passing the bridge, we engaged the Auto Pilot once past the bridge and shortly after that Affection showed up astern of us. Able to maintain a higher speed, Jeff & Judy sped off towards the Featherbed channel. We played dodgeball with oncoming vessels, which required us to disengage Otto ( our nickname for the Autopilot) and then reengage it once the power boats passed us.
We had passed through the Featherbeds by the time Summer Wind was visible astern North of the beds. She was sailing to the South East trying to spend some of the trip under sail. Meanwhile we continued motoring with the wind on the nose headed to Billy's Point.
Affection had anchored and we prepared to raft up on their Starboard side, Fenders out, Lines at the read and we approached them with the plan to drop our anchor to the south west of Affection's and drop back to come alongside her. That pretty well went as planned. It took a couple of tries, it's difficult to gauge small distances and we were trying to drop our anchor 90' in front of Affection. But we came alongside without a bump, lines passed over, more fenders hung by Jeff & Judy and before long we were secure alongside. Time for a Shower (hot water curtesy of 12 hours under motor) and a Rum.
Chris and Kelli on Summer Wind arrived and anchored off to the South West expecting that Lady Gray will be close to them the next day. Chris had an issue with his dinghy and spent a while getting that fixed.
Later, early evening, Jeff &Judy came over to share some Cheese & Wine aboard Eximius and so the Socialization began. It's always a big part of the club cruises and always a pleasure to share personal stories.
Friday night was a pleasant period, cool enough to have the hatches open but only if they had screens to keep out the mosquitoes. Jeff complained about them on Saturday morning which was surprising as I'm normally the mosy bait.
Saturday morning we launched 'Special T' our new Dinghy, that was a game! Jeff came over to Eximius and helped up maneuver it over the lifelines. Lesson learned - It's easier to push the boat rather then pull it when launching. I had made up a 20' long 4 to 1 Utility Hoist which we connected to the Spinnaker Halyard. The top block was hoisted to about 16' above the deck, the lower block was attached to the Bow Ring on the Dinghy. It was easy hoisting the dink, but awkward getting it over the side, Jeff helped with that and the Dink was in the water in just a few minutes.
The next challenge was to lower the engine off the mount on our Port stern quarter, the challenge was to get the dink between the two boats rafted together. But again, we got it done and before lunch, Special T was in the water with her engine and I was able to take it for a spin. Special T is no longer a virgin! By the time we were all done, Lady Gray was at anchor off to the North East about 200yds from Affection flying here beautiful flags, they flew straight from the mast as the wind had picked up.
The plan was for the Cruise BYOG (Bring your own grub and something to share) aboard Affection that evening. Judy did us proud! We had eight people at the party and food enough for another eight. Of course the social ranked high among our cruising history. We all wore colored glow in the dark necklaces. Discussions covered everything from the trip down to the Bay, how the boats performed and the weather. We solved several of the world's problems. Jeff & Judy brought 'Tam Tams' a chocolate cookie that few of us had ever heard of. (( Barry was due to work the following week and reported back that he had found Tam Tams in South Africa, while Chris reported that they were available on Amazon
There were a lot more stories that evening, but they are best left for the original story teller to share.
Saturday night was not so comfortable.
The boat off our Port side Stern is Summer Wind - I know, Ironic.
So sleep on Saturday night was troubled to say the least, I was up after midnight looking to see what the noise was. Jeff was up doing the same thing and he eased our stern line to allow the boats to sterns of the two boat to be set further apart. Back to sleep for a couple of hours and then dawn came through.
There was an informal plan to share breakfast on Lady Grey. We confirmed with them. the old fashioned way 'Just holler from one boat to another'. With food ready to go, we all arrived on Lady Gray where Barry & Jamie were preparing a breakfast spread. Before breaking our fast, Barry played the Star Spangled Banner - by Madison Rising. We all stood in respect of Memorial day and all of those that have given sacrifice to the freedoms we have today.
After breakfast, with the Sun out, power boats were arriving at Elliott key and Billy's point (which was about a mile from our location) Jeff & I snorkeled out to where we expected our anchors to be dug into the sea bed. We were able to find Jeff's but Eximius' was dug in so well that we could not see it. Jeff did give me some pointers on how to snorkel effectively, so I learned a new technique that did make snorkeling much more pleasant. During the snorkel, I had let go of a large plastic noodle and, once back at the boat, Peggy and Judy pointed out that the noodle was moving rapidly towards the horizon astern of us.
Chris was at our stern and quickly motored away in the direction of the noodle. By that time an arriving boat had spied the noodle and picked it up from the water. Chris was able to catch up with them and retrieve the noodle. Thanks Chris.
Of course, overnight, our two rafted boats swung at least 360º which created a bit of Macrame on our anchor chains. We spent a while discussing how to unwind the chains. First option was to try and use Affection's dinghy to to swing around the anchors in the opposite direction from the storms effect and thus release the knot in the chains. That just didn't work, despite our best effort. Next we tried to untie the knot by using Affection's engines to swing the boats around, again, didn't work. Finally we decided with myself and Chris aboard his dinghy, to pull up the chains and then Eximius' anchor allowing us to untangle the chains. That worked, but only because of a heroic effort by Chris. The water was only about nine feet deep and Chris dove several times to free our anchor but it worked. I feel that I owe Chris at least a Noodle.
With the anchors separated, we made the decision to just leave Affection's anchor holding both boats overnight. That worked for us as we planned to haul anchor before 8am Monday (Memorial Day), so now we could leave the raft up a lot easier.
The wind was to high for us to raise the dink on Sunday evening. Just after dawn on Monday, it had reduced sufficiently that we tried, successfully to hoist it out of the water. I had made a modification to the dink's painter ( a rope that is attached to the dingy to help control it when it's moving it around from outside the boat), the change involved putting a loop in the painter such that I could reach the loop from the deck of Eximius. That allowed the connection of the lower end of the utility hoist to the loop without having to reach below the water to attach the hoist to the bow eye of the dinghy.
With the hoist attached to the dink, we were able to easily hoist Special T up on deck, as soon as it cleared the lifelines, it swung in front of the mast and we could lower it down onto the foredeck. It went surprising well with very little effort. Special T - a Zar 9HDL dinghy weighs about 160lbs and the 4 to 1 ratio of the utility hoist meant we were pulling down on the hoist line with about a 40lb force, easily done when pulling in a downwards direction from the top block on the hoist. So we quickly secured the dinghy on deck and went below for breakfast.
Around 7am we had Eximius' engine running and the boat set for departing the raft up. Jeff appeared on the deck of Affection and quickly assisted in us casting off from his boat, we motored astern to clear the sides and then Veer around to the North West and head for our planned route up the ICW channel of Biscayne Bay towards the Featherbeds channel. We saw that Summer wind had left a while before us and was at least an hour ahead of us. We set the autopilot to follow the route back to the North end of Biscayne bay with the plan of deciding if we were going to go outside via Stiltsville or continue North on the ICW and head home via the ditch.
Peggy was not for us going outside. We had just gone through some heavy rain and could see the clouds dissipating on Radar, Summer Wind was already out on the Ocean and reported there was a slight swell and light winds about 45º off the Stbd bow, so it should be a nice comfortable ride home. In addition to being able to sail home, there was the advantage that we would not have to deal with all of the bridges between Miami and Port Everglades. For me the choice was obvious. The weather had improved and the Bay was nice and flat, we were sailing with just the Genoa out doing about 4 to 5 knots on under 1900 rpm of the engine, and with the wind 45º off the bow outside, it really should be a faster ride if we put out the Main sail as well. So I was for going outside. Peggy was not, quite adamantly so. Captain made the decision, we turned towards the channel entrance at Stiltsville. -- MISTAKE --
As we motored along the Stiltsville channel, following many other boats, both sailboats and power boats, the sea was very calm but I had furled in the Genoa and we had a very gentle journey to the Ocean, it was quite relaxing.
Once outside of the Channel, we started our slow turn North, my plan was to ride the gulf stream and reduce our trip time back to Port Everglades. We headed about 33ºM keeping an eye on our ground speed, looking for a knot or two lift to the North when we reach the gulf stream. That happened around Noon so at that time I turned North, we were outside of the route to Miami channel and so I put in the Port Everglades Outer buoy as the target destination. Skies were clear, not much wind but I put out the Genoa and we kept the diesel running, still below 2000rpm.
Well, that didn't last! We were about 7 nautical miles south of Port Everglades, wind started to pickup and I furled in the Genoa to just a handkerchief. We were motor sailing with the wind backing more to the North, Seas were starting to pickup. Peggy was not happy, that's putting it lightly. We normally wear our life jackets when on the Ocean, but at this point we put on our Tethers and, with Peggy below, I hooked my tether near the helm. The wind increased. Sorry, but our wind data was not working ( more on that in the next post), however, we received a VHF call from Summer Wind advising that the winds near the Port Everglades Entrance were sustained at 20knots and we knew it was gusting, but we were doing 6 - 7 knots through the water but only 4-5 knots overground despite the Northerly winds. I furled in the sail completely.
All of sudden, while dealing with the significant wave action and the gusting winds, our speed through the water dropped to 2knots! We're less than two miles off shore, waves wanted us to go that way and the wind was not steady North but gusts seemed to veer to the East.
I guessed we had picked up something on the Prop and instead of it pushing water astern of us thus moving us forwards, it's now probably just a ball spin with virtually no propulsion. I also noted that there was smoke or steam coming out of the exhaust. I slowed the engine to Idle speed, shifted to Neutral, then into reverse and revved up with the intent of dislodging anything on the prop. We've picked up Poly bags before, same feeling, same process so it might work this time too. But when I put the engine in reverse, Peggy could head a 'whomping' sound from inside the cabin and the engine shut down. Again, this not a good situation. I checked the raw water strainer first, it was not totally clogged with Sargassum but close. Cleaned that out. Then I checked the Raw Water thru hull, just a few seconds to release the hose clamps with the handy tool that I keep near to that thru hull, water squirted in and so that was clear. Time to try and restart the engine before I considered calling for a Tow Boat. When I tried to start, it didn't! Ok, maybe there's a problem with the start battery - I asked Peggy to switch the battery selector to 'Two' tried to start again, nothing! Grrrr. Ok one more time, switch the selector back to normal and let's try - DUH! - the engine was still in gear! I put it into neutral, tried to start it again and it instantly started without any issues. We're moving again!
Worried that the steam/smoke was another indication of a problem with the engine colling system, I keep the rpm below 1800 and we continued the bumpy ride up to Port Everglades.
We both agreed that we could anchor in Sunrise Bay for the Monday night and catch the High Tide Tuesday morning , so we anchored in the Bay.
Before we took a break, I pulled the engine covers off and started checking the engine. Coolant levels - OK, Raw Water impeller pump, OK, Oil OK, Drive belt OK, we're looking good. Clean up and take that well earned break.
We heard from Summer wind and Lady Gray that they had got back to their docks safely, things were looking better.
After a hot shower, we had Shepherds pie for dinner along with wine for Peggy, and a glass of rum on an Ice Ball for me.
We both slept well!
Tuesday morning we caught the 8:30am Sunrise Bridge opening, then the Las Olas Blvd bridge and turned up the New River.
The New River bridges are locked down from 7:30am to 9am and 4pm to 6:30pm weekdays for the rush hour traffic. Our arrival at 3rd Avenue bridge was timed so that we would get there just after 9am. Of course, it's never that easy, the FEC Railroad bridge went down before we got past the 'Tunnel' ( that the tunnel that allows US 1 to pass under the New River. ). I decided to stay downstream of 3rd avenue bridge rather than risk getting stuck between 3rd and Andrews Avenue bridges, the wind and current would not make that an easy place to hold station. On the other hand we were near the Tunnel, the River is quite wide there, and much easier to hold station. The bridge was down for about 20 -25 minutes. As soon as it was rising, we turned upstream and called 3rd avenue bridge for an opening. As we passed under 3rd, we could see there was a 70' motor vessel under tow between the two bridges. Good decision not to pass 3rd any earlier.
Once past 3rd avenue bridge, Andrews Ave bridge opened, the downstream heading vessels held back while the upstream vessels, and the Tow, cleared, then we turned and followed the Two through 7th avenue bridge, we then turned onto the North fork of the New River and headed back to our dock.
As always, it was a memorable trip. Thanks Jeff, Judy, Chris & Kellie, Barry & Jamie, we really enjoyed the trip, even the challenges. Looking forward to next year.
Of course, I would be totally remiss if I didn't acknowledge Peggy's better choice for the trip home.


