Wednesday, February 22, 2017

How far to go in Google Maps

Google Maps

Ok, I'm a sucker for net tricks, and Google Maps has a very cool feature that allows Distance Measurement. When I mentioned this to a sailing buddy, he asked if I would write up the process. So here goes.


How far is it from Point A to Point B on the Ocean?
Step 1: Open Google Maps and zoom into the area of interest like this:


This pic shows the map of the Atlantic Coast with Boca Raton at the North and Port Everglades Zoomed to 2 Miles. It's clickable so that you can go to the Map if you have an active Internet Connection.

Step 2: Place a Mark on the Map 


I'm going to measure the distance from Lake Boca to Hillsboro Inlet and then to Port Everglades.
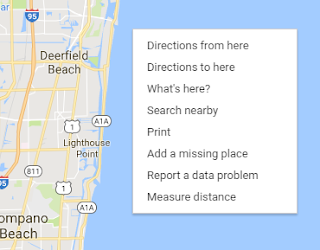
To place the 1st mark, right click on the Map close to the Inlet at Lake Boca, then select 'Measure Distance'


Now you should see the 1st Mark on the screen, (I have placed an arrow and text to point to the mark. It's that round black circle with a white core)


Step 3: Place the 2nd Mark

Now mouse down to the location where you wish the next mark, in my example, that's going to be the Hillsboro Inlet, Then Click and the distance from the 1st Mark to the Second will be shown.

In the current (February 2017) version of Maps.Google this line between the 1st Mark and the 2nd Mark has graduation marks along the line and the distance at the 2nd Mark


Step 4: Adding more Marks

When you click elsewhere on the Map, you'll see a new Mark with the distance shown to that Mark from the 1st Mark.
Now this is starting to become useful.

I can add marks between any other two marks just by dragging any point on the line between two marks.

To delete a mark, just click on the Mark and it's gone.


Here I have added a 3rd Mark by dragging a point on the line out to the East. Notice how the distance is updated automatically.

I use this process when I'm guestimating the distance for a Sailing trip. It's quick and easy.

I have not yet figured out how to share a Map including the Measured Distance Marks & Lines, so if you know how, please comment to share it.

The process is similar on a Tablet, but there's no Right Click Option,
On my Android Tablet, I follow the steps above, but to place the first mark I just touch and hold a point on the map, that plants a Marker and description a description at the bottom of the screen. If I tap that description, it brings up options including Measure Distance!
To add additional marks, scroll to where you want the next mark then just tap the + Add Point icon in the lower left corner of the screen. That same process can be repeated. The options on a PC are far better.

Just to prevent argument! I only use this process when I want to quickly measure distances. When it comes to Route Planning we use Garmin Home Port, that allows us to export our routes to our onboard GPS system.

I hope you found this useful. It's quick and dirty, but sometimes it's the quickest option that counts.

See you on the Water.

Paul


Saturday, February 11, 2017

Sleep Lightly

It gets really dark at night in the Cabin

When we are onboard overnight, we turn off practically everything except the Anchor light and Anchor Alarm if at Anchor, the Refrigerator (it's always on when we are aboard). So the Anchor Alarm (handheld GPS uses the least power of any option) is the only illumination in the Cabin overnight. That doesn't go down to well with Peggy, she has slipped on the Cabin Entrance Steps a couple of times, luckily nothing nasty, but it did highlight the need for some overnight lighting.

So last week installed 3 white LED lights placed to light up the lower steps of the Cabin Entrance, and the 'Hallway' (inside joke) as well as the Aft Cabin.

Cabin Step Lighting

This one is on the aft side of the Galley below some fitting that we have absolutely no idea of it's purpose! 

The lamp shines down on the lower step of the Cabin Entrance, it's white, and we have a bottle of Red Nail Varnish to tint the lens if it proves an issue with our night vision.


Aft Cabin Entrance Lighting

This one is just inside the Aft Cabin Entrance door on the inside and below the seat.

Again, we'll tint it red if it impacts night vision. We won't know till our next overnight trip.


 The 'Hallway' light

This one is mounted just below the Fold down Galley Counter extension opposite the Nav Table.


Here's that same lamp with the Counter Extension in the Raised Position (note the support brace is Starboard, the old, plywood piece was falling apart - just not strong enough.)

The Electrical wire runs from the Aft Cabin under the galley floor into the Galley counter base to the Cabin Entrance Lamp, then to this lamp. Then it goes down to the floor and under the Hallway into the Port Seat which holds the Holding tank. Then it passes up behind the seat inside the aftmost storage bin, up and aft into the Electrical Panel area.

The -ve is labeled and connected to the -ve Bus Bar behind the Electrical Control Panel, the +ve is connected to a toggle switch mounted on the inboard side of the Nav Shelf (It's a stand alone switch and easy to get reach from the Cabin Entrance Steps.) the Switch is supplied by a wire to the Cabin Lights Circuit Breaker on the Electrical Panel.


Cost

I purchased 100' of 18AWG twin tinned stranded copper wire, 6 Lamps (I have 3 left over) and 6 Switches (I have 5 that will be used for other lamps elsewhere on the boat) so the whole installation cost less than $25. 

And best of all - Peggy is happy!

See you on the Water.

Monday, February 6, 2017

My First Jib Sheet Bag

My First Jib Sheet Bag.

Peggy complains about the Sheet lines loafing about in the Cockpit, always concerned that she will trip over them. Just for those that are not too familiar with the use and size of the Jib Sheets: The Jib sail is that big triangular sail on the front of the boat. When we are sailing, the two lines from the Clew of the sail (the aft most corner of the foot of the sail) is in tension held by one of the two Jib Sheets, each 45' long. One line (the active sheet) is wrapped around the Winch on the leeward side of the boat (opposite from the windward side of the boat) while the Lazy Sheet is loose on the Windward side of the boat. 
Now, both lines should be neatly stowed at all times but accessible for any adjustments such as tightening the sail or easing the sail. The Lazy sheet has to reach all the way around the front of the mast to the clew of the Jib. So the part of it that is in the cockpit is much shorter than the Active sheet which only has to reach from the winch to the clew on the same side of the boat. Got it?

When sailing any distance, we're probably not tacking back and forth as much as we might when in a race. We're probably taking it easy and might stay on the same tack for at least a half hour, possibly more, possibly several hours. So when that is our game plan, then it makes sense to stow the lines yet still make it easy to grab them for altering when needed.

To stow them, I decided to make a Sheet Bag to hang on the Lifeline, and if it works out, I'll make a second.


My First Jib Sheet Bag

Here's some pics that shows how I made it.

Parts:

The Back plate is Sunbrella to match our existing boat canvas (Royal Blue Tweed). It has a flap at the top that folds back over the top lifeline and another near the bottom (12" below the top) which folds over the lower lifeline.

The Lower flap is made separately (it's the small blue piece in the pic) 

The Front plate (shown beneath the Sunbrella in the pic)  is made from Phifertex which is a mesh that will allow the Sheet line to drain if it's wet.

The Flaps have Velcro hook & loop to secure them to the lifelines.


Top of Front plate

Shown here, the top has been cut and folded to form the angle (45°) where the sides meet the Back plate and the front of the Bag.

The front piece is then cut away to leave a 3/4" hem, more for reinforcement than anything. I also left the folded sides (the piece under the thread reel and scissors) rather than cut them off, again, just to add strength.


Binding the top of the bag Front plate.

I used some 1.25" Binding tape to neaten up the front of the bag as well as make it look just like a pro finish.

It's not easy sewing the binding without a binding attachment, so I first pressed the binding folded in half with my tailors hot iron and that made it a whole lot easier. Turned out really nice.


Forming the bottom of the Front plate

Pretty straightforward, I marked out everything before starting to cut or sew any of it. Forming the bottom was just a case of folding the bottom and each side so that the marks lined up then run it through the machine. You can see the 3/4" seam markings along the side. So this is the Inside of the Bag, it will be turned inside out when the bag is done.


 Reinforcing the bottom of the Front plate

Again, by leaving most of the folds on the bottom and only cutting off a small amount in the middle, this should extend the life of the Sheet Bag.


The Back Plate

This shows the Back Plate complete. The Top Flap has matching Velcro strips that close over the top lifeline.

12" below that is the Lower Flap that folds over the lower lifeline. 

When I make the second bag, I'll make the lower flap about 1" narrower, when I joined the Front Plate and the Back Plate the first time, I accidentally sewed through the flap. If it is a 1/2" in from each side that wouldn't be a problem and it would simplify the process of sewing the Back Plate to the Front Plate.


 All done.

Doesn't look as good in this pic, but I'm really pleased with the way it turned out.

I'll add some pics of the Bag installed tomorrow.

Hopefully, Peggy will be happy that the lines, well, one of them right now, will be out of the way. It has a second advantage, this will move the line off the winch when we're not sailing, so I can make some Winch Covers next

Update Feb 7th. 2017

Installed on the boat this afternoon, looks SWEET!


See you on the Water.

Thursday, February 2, 2017

Great Birthday - Thanks

Thanks Bill - Great Birthday Sail


An unexpected call from Bill asking if we wanted to go out on his boat for a day sail - Bill did not know it was my birthday, and I didn't mention it. But Peggy was happy to go. We had met with Bill & Colleen several times, they are always good for a chat, especially if the subject is sailing, Lobsters or the Bahamas.

We arranged to meet them at 11:30 and stopped by Eximius to pickup Peggy's Jacket, Gloves and PFD and spot.

Despite the traffic, we arrived at the Fort Lauderdale Yacht Club around 11:20am, so we had time to update our Spot Locator message.

At the Boat, Bill greeted us with his typical humor and we climbed aboard with the boat at high tide.

Bill had done much of the departure prep before we got there, so it was only a few minutes before I was able to help cast off and we backed out of the slip at the Yacht Club. Coolleen was doing other stuff today, so it was just the three of us.

We motored out of the FLYC channel into the Intra Coastal Channel and headed for the 17th Street Bridge. There was 55' of clearance, so we were able to pass under the bridge without an opening. 

Turning out towards the Ocean, we could see that it was going to be a nice sail, not a lot of lumpy water out there. 

We raised the sails once outside the entrance and turned South, but the wind was fickle, so we turned to the North just so that we could hug the coast, and then Bill enabled the Auto Pilot. He has the same model we have just a few years younger. 


There was a submarine just outside Port Everglades, it was heading South so we guessed it was not going into the port. As always, there were a bunch of ships at anchor off the Fort Lauderdale beach waiting to go into port. The wind from the East veered to the SE some of the time, but we had a really nice, easy and comfortable sail up towards Hillsboro Inlet, but not going quite that far (the track shows our Spot locations throughout the sail.)


Around 12:30 Bill brought out the sandwiches and we sat around the cabin table discussing our upcoming trip to the Bahamas. Bill & Colleen have done that trip - lots! And have plenty of local knowledge as he has been sailing this area and the Bahamas for around 40 years.

When you go out with  a seasoned sailor, you have to expect a few sea stories, heck, I have a few, and sailors are normally happy to share them. Bill is no exception, he kept us laughing, intrigued and excited with his recollections of  past trips. Not only is that fun, but we also learn a lot from them. Thanks Bill.

After turning South to return, Bill disabled the Auto Pilot and invited me to take the helm - This is the way to celebrate a birthday! The boat behaves quite different from Eximius, I had to learn how close the boat would sail and so quickly put the boat in irons. But after a few minutes we were able to turn back off the wind and then head South. 

The wind was it's normal finiky unstable self, but we made good progress all the way down the the Port. Bill was comfortable enough to take a cat nap on the stern seats. Seeing how he set himself up to relax, I realized he had done that often before. It was easy to bring the boat up during the puffs and head off during the lulls. I kept us out away from the beach just in case the wind died down and that would need us to tack back out. As it was, we were easily able to get all the way to the Port on a Port Tack. Bill did remind me that his boat had less than 4' of draft and getting closer to the shoal marker in Duet was not as risky as it is on Eximius. 

Once were past the shoal marker, Bill started the engines and powered up so that we could lower the sails. There's plenty of deck to get around on Bill's boat, so the sails were soon dropped and furled, zipped up in the mainsail's stack pack and ready for the return.

As we came in, Wizard was in front of us - nice boat if you like to race 

We easily passed under the bridge and turned up to the FLYC channel. In just a few minutes, we were tied up and the engines shut down. 

Bill brought up the Beer!

Thanks Bill for a great sail today, we both enjoyed every minute. Don't hesitate to ask us out again!

See you on the water. 


If you click on the expand icon in the title bar of the map above, you'll see the track we took. The waypoints with a Camera Icon have a pic.