Thursday, October 20, 2022

Installing Orion DC-DC 12/12 18Amp TR Smart Charger

 Orion DC-DC 12/12 18Amp TR Smart Charger Installation

Here's a link to why I'm doing this, basically it's to charge our Start Battery.


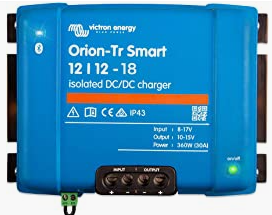
Overview of the Orion Charger


The Install was pretty easy.

Mount the Orion on the bulkhead below the other Victron equipment

Drill a hole through the bulkhead for the wires from the Orion to the Start Battery

Make up an empty Fused wire for the +ve connection from the Orion to the Multiplus.

Make up the wire for the -ve connection from the Orion to the Multiplus

Inset the fuse and power up the Orion - Update the firmware and the program for AGM battery ( see note below ) then power it down ( remove the fuse. )

Makeup the Fused wire from the Orion output to the Start Battery +ve
Makeup the wire from the Orion output to the Start battery -ve.

Insert the Orion input fuse
Insert the fuse at the Start Battery
Monitor the Start Battery status on the VictronConnect App on my phone.


Notes:

  1. At present there is no way to view the Orion Smart DC/DC charger on the VRM. I did read where someone had installed a Smart Shunt into the -ve connection from the Start Battery to the Orion but have not figured out if it's worth it yet. There's also some issue as the Orion is an "Isolated" charger, but the Start Battery and the House Battery share a common ground. More research to figure that one out.
  2. The Preset Charging Profiles in the Orion do not appear to support AGM batteries except for Tubular batteries. However, Selecting any of the AGM type profiles and editing the profile switches to a User Defined Profile. We looked up the Duracell AGM SL178 charging profile and updated the charger's profile with those numbers.
  3. Although we cannot see the status of the Orion in the VRM we can see it via Bluetooth at the boat. Also, we can see this:


We did a test start of the engine today, 1st time using the new battery. What a delight, it virtually jumped into action. After 90 seconds the Tacho showed that the Alternator was running. We were on shore power and the VictronConnect app showed that the charger was in Bulk mode, a short while later, it dropped into Absorption and finally into Float.  Looks like I made the right decision.

See you on the water - We'll be taking the boat out tomorrow for the weekend.


Monday, October 17, 2022

Update on the Balmar MC 168 Install

 Update on the Balmar MC 618 Install

The install is complete.


It's really difficult to keep the wires very tidy. But I was able to keep the fuse in an easy to access spot.

Note the Old external Regulator is re-mounted just forward of the new Balmar.

I emailed back and forth with PKYS about cutting the Battery and Alternator Temperature Sensor cables to improve the wire management. 

If you do cut these, it's a good idea to leave at least 2" of the Red and Black conductors beyond the outside sheathing, it makes inserting the Spade connectors onto the Balmar terminals. I had to recut my first attempt which kept them short and it was basically impossible to make the connections.

Having completed the install we had a few 'Pre-Flight' checks which are very clearly documented in the Balmar Manual.

I did note that the Engine Control Panel Tachometer drops to Zero during programming. That caused some concern as I had read on various forums that the Tach would not work when it was connected to the Balmar rather than directly to the Alternator. Once the Balmar saved any changes and dropped out of Programming mode, the Tach started reading correctly.

The only changes that I made in the default programming were:-
  1. Changed the Belt Load Management setting to 70%
  2. Set the Delayed Start from 1 second to 90 seconds.
The reason for #2 is to reduce the load on the Starter. This has a useful but unintended consequence. When the engine is started, the Balmar does not turn on for the 1st one and half minutes. The consequence is that the Tach does not display! But as soon as the Balmar passes it's 90 Delay start, then the Tach does start up. I find this useful as when the engine starts the Tach should read zero and 90 seconds later it should show the current RPM.

I wanted to set the delay to 2 minutes, but it takes forever to cycle through the programming steps and I just ran out of patience at 90 seconds ( which takes about 3 minutes.)  But 90 seconds is fine.

So, that completed the install and programming. We checked that the thru hull for the raw water was open and started the engine. Because of our dying starter battery, it took 3 tries to start the engine. See my last blog entry about that battery update.

At this point I'm very pleased with the install. We're taking the boat out for a multiday trip next weekend, that will involve at least 8 hoiurs of motoring and plenty of pull on the house battery capacity. 

Now, if the new Victron DC/DC 12/12 18Amp Smart Charger arrives before the weekend, I'll probably install it while we're on the boat :)

See you on the water.


Saturday, October 15, 2022

Charging the Start Battery

Charging our new Start Battery


Purchased a Duracell 12v AGM SL178 Battery to replace our 5.5 year old battery ( same make and model)

We found that our old battery was not being charged unless Shore Power was connected to the boat.

We had issues starting a few times recently and figured we should take the battery out of the equation.

The old battery will spend retirement in our Home Generator which has a long dead battery. Used the old Generator battery for the Core Charge recovery.


We need a reliable way to charge the start battery. Our House batteries ( 4 x Trojan 6v T105 Batteries in 2S2P configuration for 12v 450Ah.) and I decided to go for the Orion TR Smart 12 | 12  18 Isolated DC to DC Charger by Victron. 

Just adding to our Stable of Victron System equipment :)


The Orion can be used as either a Charger or as a Converter ( ie. stable DC output ) My plan is to use it to charge the Starter Battery from the House Battery. From everything I have read, it should only go into charge mode when the Input V ( House Battery V) is above a set limit ( set using the VictronConnect App ) and when the Starter Battery V is below a set limit ( again, set in the App )

So basically, this will mean that the charger will try to charge the start battery when the house battery voltage is above it's float value and if the Start battery is below it's Absorb value.

The House battery V goes up when it's being charged. ie. If the engine is running, the Multiplus is charging or if there is sufficient Solar to charge the House Battery. 

If that concept is incorrect, then there are other choices such as a manual switch to turn the Orion on, or the Engine Detection System override which would turn the charger on when the Alternator is running. 
Whichever method I end up using, it should involve keeping the existing Alternator to house Battery connection. I plan on upgrading our House Battery bank from Flooded Lead Acid to LiFePo4 batteries later this year/ early 2023. Their cost has dropped significantly in the past 5 months. Right now the Chin Batteries are looking good.

This diagram is modified version of the one in the Victron manual for the Orion.


This shows the Source ( Input ) supply being the House Battery and the Charged Battery being the Start Battery.

The Start battery is just a couple of feet away in a straight line, perhaps 6' around the bends from the other Victron Equipment. So I plan to install the Orion on the bulkhead adjacent to the Multiplus.

That will enable a short run of cable to the Positive Bus Bar and the Negative Bus Post, for the Input cables. The output will pass through the bulkhead adjacent to the Multiplus into the locker where the Start Battery is located.


I'll mount a 20Amp fuse on the +ve Bus Bar to the input of the Orion and a 20Amp fuse inline of the wire from the Orion to the Start Battery +ve.  The Start & House batteries share a common -ve. Victron don't make the 18Amp Orion in a Non-Isolated version and I understand that it's ok to join them, so there will be a wire from the -ve in and the -ve out to the -ve Bus post.

I'm curious to see if the Orion shows up in the Victron VRM if it does, then I should be able to view the charging history online. That would be cool too.

Ok, waiting on the arrival of the Orion, I have everything else. The max wire size for the unit is AWG6 
The Wiring calculator shows 14AWG but I'll use 10AWG.