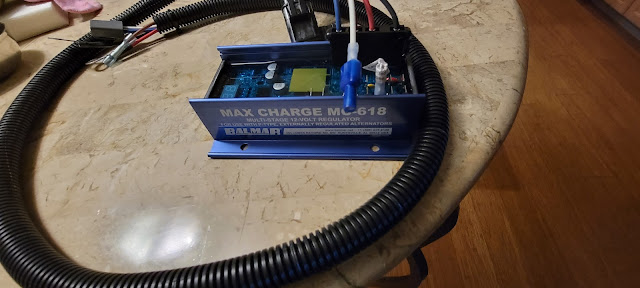
Installing a Balmar MAX Charge MC-618-H Regulator
Our existing External Regulator is a backup unit from when the Zantrex Power Management System was installed, now replaced with our Victron Power Management System. The old external regulator does not have the features to protect our Balmar 6 series 100A Alternator nor does it consider the battery temperature nor the Battery Voltage. The Balmar MAX MC-618 does ( The H indicated that it is supplied with an electrical harness.)
I purchased the regulator from PKYS online and was surprised that it's cost was competitive with Amazon and it's delivery was at least as good, it arrived early. When it arrived, I thought I had the wrong item. I sent an email to PKYS explaining that they had sent the wrong item.
But!!! As you can see from the picture above, it's identified as a MAX Charge MC-618 not as an MC-618-H, I found that the label on the underside of the regulator shows it's a MC-618-H I and sent a follow up email to PKYS apologizing for my mistake.
I read through the manual again and realized that I didn't order the two Temperature Sensors, Duh! I placed another order for them. After placing the order, I called PKYS just to make sure they didn't react to my first email regarding the wrong item. They actually picked up the phone and responded to my query. Very helpful. The order for the two temp sensors arrived a day earlier than expected ( ordered Monday arrived Wednesday )
As I mentioned, I read the manual. It's online but I downloaded it and stored it in my 'Manuals' folder for future use. I'm going to print it to keep on board with my other manuals, just in case I'm ever out at sea and no net connection.
Ok, Onto the Installation.
My plan is to keep the existing dumb regulator as a backup, it works, just not very efficiently.
Here's the rough process:
- Install the Regulator ( 4 screws ) adjacent to the old regulator.
- Run the wiring harness into the engine area and connect to the Alternator
- Run the Alternator Temperature Sensor wiring to one of the Alternator Body Nut-n-Bolt
- Run the Battery Temperature Sensor beneath the engine area Port side into the Battery bay just forward of the Galley forward bulkhead ( about midships )
- Run a cable for the Battery Voltage Sense wire alongside the Battery Temperature sensor cable.
Turns out it was the Drive belt lose again! I went to Broward Bolt and got a few of these Nord-Lock washers used to keep Turbo Units on cars & trucks from shaking lose.
I need to adjust the belt tension and lock the bolts in place with these washers.
FYI, I make a point of going to Broward Bolt as soon as I need any type of bolt, nut or washer!
1560 N Powerline Rd, Pompano Beach, FL 33069
The staff are awesome, they have never been out of stock for anything that I needed and have always been really helpful. Must admit, when I first went there a few years ago, I was expecting they would be expensive but happily surprised that their prices are very reasonable. They are not sponsoring me at all, I just feel the need to promote really good customer service. Give them a call next time you need Nuts, Bolts or Washers ( and drill bits, hole saws and two part epoxy mixes - the type in Tubes like Caulk ) (954) 960-1740
Here's the wiring diagram for this project.
OK, we're headed down to the boat in the morning, I'll try to take a bunch of pics of the install and Alternator Tensioning.


No comments:
Post a Comment
Got questions or suggestions about our boat, our sailing or our adventures?
Leave a comment.
Thanks.