Saturday, November 19, 2022

Cabin upgrade Pt. III ( New Table)

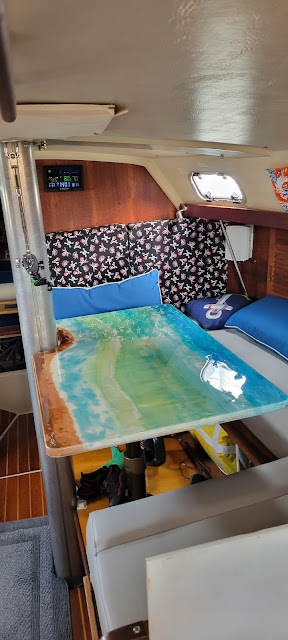
New DIY Cabin Table

It has take over a year to complete our new Cabin Table on Eximius, but it's finally finished.

Here's a link to the early build articles Part 1 & Part II

Just in case you didn't know, we're in South Florida - and there's this thing 'Global Warming' happening. Well in Florida, that 'thing' is really obvious, it's warmer and the sea level is rising, we regularly have bigger floods and that's despite the grass suffering from a lack of rain.  The long and short of it is that it's been too warm to work with the resin -  until this week! November 2022 - the outside temperature was in the mid 60's. I quickly pulled the project out of storage and set to work. All it needed was a sander to remove a few tidbits from the surface and neaten up the edges, flood the surface with clear resin and use the heat gun to flatten where needed.  I followed that with a coat of grey outdoor paint on the underside.

Build complete.
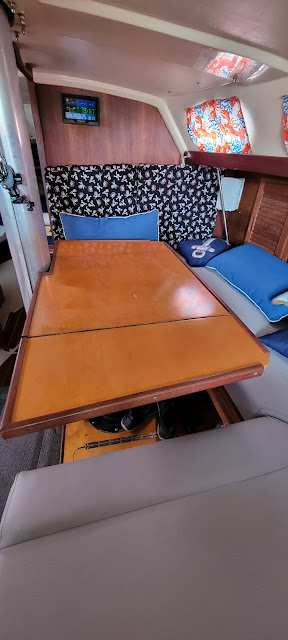
Before


After


Installing the table was easy.
The old table is connected to the central rising post with six screws and the post top is secured to the post with a single screw that forces a metal wedge against the post to keep the top steady.

A couple of minutes with my electric screwdriver and the top was off.

Laying the new table top on top of the post mount, I adjusted it's position so that the Starboard edge of the table was parallel to the edge of the seat. Then it was simply a case of screwing the table from below. Really easy.

Here's the result.  I would give myself about an 8 out of 10 on the production, but it's artistic, so it'll do just great.  Will probably make a fitted table cloth to cover it for when I do projects in the cabin.

Now to work on that forward bulkhead.

Another Project completed.


Sunday, November 6, 2022

A stitch in time

A sailors Stitch in time

Sailors know that wind can pop up really quickly and if your sails have a weakness then the wind will find it and find it quickly.

After our last trip, I noticed some broken stitching on the Genoa Sunbrella cover, about half way up the forestay. That's an 'in' for the wind to make a very expensive tear in the sail while out on the water. I have to fix that early.

So after recovering from the hectic party weekend with our friends from the HISC sailing club, we went back down to the boat and lowered the sail.

First I released the locking line that prevents the Furler from turning and thus prevents the sail from unfurling, then I released both of the Jib sheets, flaked out the Jib Halyard and released the furling line. Then went forward to pulled the sail down flaking it along the deck and on top of the inverted dinghy. It came down pretty smoothly. Then Peggy & I rolled it, not so easy, so that it would fit inside the sailbag.

We ( me ) had left the Aft whip secured to the Bimini when we left for the weekend party, it ripped out of the dock mount and needed repair. So we headed home with the sail stuffed into its bag and the Whip secured to the bed of our F150 ( towel wrapped around it where it touched the truck roof and secured with a few webbing straps.) Of course, Peggy wasn't so happy about us taking I95 back home with the 14' whip tied to the truck, but I persuaded her it would be just fine.

It was, we got home and I proceeded to plan the repair to the sail and the whip. 

Next morning I cleaned up the split end of the whip and mixed up a few ounces of resin. With a cheap paint brush I spread the resin into the open wounds of the whip and then closed it up using a half dozen old hose clamps. Then I setup my Sailrite Sewing machine and moved stuff around in my garage to handle the huge sail. While inspecting it to locate the area of stitching that needed resewing, I realized that the original Thread was no Tenera nor any other type of PTFE thread and that about 20% of the sewing on the Sunbrella cover had deteriorated. 

Meanwhile, Peggy called me from the laundry room that the washing machine was broken. Of course that's more important than the sail, I can do that anytime.

Figured out that the Washing Machine Pump was either not working at all or barely working, The tub was not emptying.  Off to google and the search for a fix. It's a common problem and Amazon has the pump for just $26. Google's YouTube had many videos showing how to replace the pump, not quite the same model as our machine but each of them pretty well had the same process. So I ordered the pump on A Prime.  Back to sewing.

Further inspection indicated that I should really restitch the entire Sunbrella cover, that's the full length of the Sails Leach ~44' and Foot ~ 13.5' That's a lot of stitching but my Sailrite machine is up to is, I have sewn bigger pieces. There's just going to be a lot of canvas laying around my garage as I try to feed it through the Sailrite Sewing Machine ( it's an LSZ-1 ) 

I spent a couple of hours sewing. The LSZ-1 handles sewing the sail with ease. The sail is pretty thick, there's a minimum of 1 layer of Dacron with One layer of Sunbrella which folder over the leach or the foot so that's a total of three layers. Then there are the overlaps in which case there are 6 layes - 2 of Dacron and 4 of Sunbrella. Sewing all of those was a breeze, each of the Sunbrella segments needed 3 rows of Zig-Zag stitching a line parallel to each edge of the Sunbrella and then a set of diagonal reinforcement lines about every eight feet or so.  The Leach required at least 280' and the Foot required 81' of PTFE Thread. I use Sailrite's Lifetime PTFE thread. It's difficult to get the tension right, but worth the effort.


Halfway through the sewing, Amazon delivered the Pump - that's the same day that I ordered it. First thing the next day the pump replacement floated up to the top of the Honey Do List. It only took a couple of hours to take the washing machine apart, replace the pump and put it all back together. Total Cost $28.76, that would probably have cost us at least an Arm if not an Arm and a Leg if we had a tech from Kenmore come out to fix it, and it would not have happened in just a couple of hours.

With the Washer out of the way, back to sewing. I was able to complete all of the restitching  of the Sunbrella and I looked over the stitching of the Sail itself. It looks like they did use a PTFE thread for sewing the Dacron, phew! because that is a lot of sewing to restitch that!

The final part of the sail repair was to inspect and restitch the webbing at the Head, Tack and Clew of the sail. Thankfully they all look very well sewn and not in need of restitching. However, the  thickness of the Sunbrella, the Dacron and the Webbing is just at the limit of my choice of machine needles. I'll call Sailrite in the morning to see which is the best size needle to use. I broke one today just as I was starting the backstitches at the end of the second piece of webbing on the Tack of the sail - I thought I would try it out, just too heavy for my needle.

Ok, Stitch in time is done, also fixed the Washing machine and the deck Whip, not bad for a couple of days work. 

Looks like a really wet week ahead of us, so we'll fold the sail up and put it back in it's bag till later when we can put it back on the boat. We're planning on heading out for a Thanksgiving Friendship Cruise with our sailing club and, of course, there's Thanksgiving on Thursday that week before the cruise. So we have most of a couple of weeks to get the boat back in order.

Till then.

Stay safe, and we'll see you on the water.


Thursday, October 20, 2022

Installing Orion DC-DC 12/12 18Amp TR Smart Charger

 Orion DC-DC 12/12 18Amp TR Smart Charger Installation

Here's a link to why I'm doing this, basically it's to charge our Start Battery.


Overview of the Orion Charger


The Install was pretty easy.

Mount the Orion on the bulkhead below the other Victron equipment

Drill a hole through the bulkhead for the wires from the Orion to the Start Battery

Make up an empty Fused wire for the +ve connection from the Orion to the Multiplus.

Make up the wire for the -ve connection from the Orion to the Multiplus

Inset the fuse and power up the Orion - Update the firmware and the program for AGM battery ( see note below ) then power it down ( remove the fuse. )

Makeup the Fused wire from the Orion output to the Start Battery +ve
Makeup the wire from the Orion output to the Start battery -ve.

Insert the Orion input fuse
Insert the fuse at the Start Battery
Monitor the Start Battery status on the VictronConnect App on my phone.


Notes:

  1. At present there is no way to view the Orion Smart DC/DC charger on the VRM. I did read where someone had installed a Smart Shunt into the -ve connection from the Start Battery to the Orion but have not figured out if it's worth it yet. There's also some issue as the Orion is an "Isolated" charger, but the Start Battery and the House Battery share a common ground. More research to figure that one out.
  2. The Preset Charging Profiles in the Orion do not appear to support AGM batteries except for Tubular batteries. However, Selecting any of the AGM type profiles and editing the profile switches to a User Defined Profile. We looked up the Duracell AGM SL178 charging profile and updated the charger's profile with those numbers.
  3. Although we cannot see the status of the Orion in the VRM we can see it via Bluetooth at the boat. Also, we can see this:


We did a test start of the engine today, 1st time using the new battery. What a delight, it virtually jumped into action. After 90 seconds the Tacho showed that the Alternator was running. We were on shore power and the VictronConnect app showed that the charger was in Bulk mode, a short while later, it dropped into Absorption and finally into Float.  Looks like I made the right decision.

See you on the water - We'll be taking the boat out tomorrow for the weekend.


Monday, October 17, 2022

Update on the Balmar MC 168 Install

 Update on the Balmar MC 618 Install

The install is complete.


It's really difficult to keep the wires very tidy. But I was able to keep the fuse in an easy to access spot.

Note the Old external Regulator is re-mounted just forward of the new Balmar.

I emailed back and forth with PKYS about cutting the Battery and Alternator Temperature Sensor cables to improve the wire management. 

If you do cut these, it's a good idea to leave at least 2" of the Red and Black conductors beyond the outside sheathing, it makes inserting the Spade connectors onto the Balmar terminals. I had to recut my first attempt which kept them short and it was basically impossible to make the connections.

Having completed the install we had a few 'Pre-Flight' checks which are very clearly documented in the Balmar Manual.

I did note that the Engine Control Panel Tachometer drops to Zero during programming. That caused some concern as I had read on various forums that the Tach would not work when it was connected to the Balmar rather than directly to the Alternator. Once the Balmar saved any changes and dropped out of Programming mode, the Tach started reading correctly.

The only changes that I made in the default programming were:-
  1. Changed the Belt Load Management setting to 70%
  2. Set the Delayed Start from 1 second to 90 seconds.
The reason for #2 is to reduce the load on the Starter. This has a useful but unintended consequence. When the engine is started, the Balmar does not turn on for the 1st one and half minutes. The consequence is that the Tach does not display! But as soon as the Balmar passes it's 90 Delay start, then the Tach does start up. I find this useful as when the engine starts the Tach should read zero and 90 seconds later it should show the current RPM.

I wanted to set the delay to 2 minutes, but it takes forever to cycle through the programming steps and I just ran out of patience at 90 seconds ( which takes about 3 minutes.)  But 90 seconds is fine.

So, that completed the install and programming. We checked that the thru hull for the raw water was open and started the engine. Because of our dying starter battery, it took 3 tries to start the engine. See my last blog entry about that battery update.

At this point I'm very pleased with the install. We're taking the boat out for a multiday trip next weekend, that will involve at least 8 hoiurs of motoring and plenty of pull on the house battery capacity. 

Now, if the new Victron DC/DC 12/12 18Amp Smart Charger arrives before the weekend, I'll probably install it while we're on the boat :)

See you on the water.


Saturday, October 15, 2022

Charging the Start Battery

Charging our new Start Battery


Purchased a Duracell 12v AGM SL178 Battery to replace our 5.5 year old battery ( same make and model)

We found that our old battery was not being charged unless Shore Power was connected to the boat.

We had issues starting a few times recently and figured we should take the battery out of the equation.

The old battery will spend retirement in our Home Generator which has a long dead battery. Used the old Generator battery for the Core Charge recovery.


We need a reliable way to charge the start battery. Our House batteries ( 4 x Trojan 6v T105 Batteries in 2S2P configuration for 12v 450Ah.) and I decided to go for the Orion TR Smart 12 | 12  18 Isolated DC to DC Charger by Victron. 

Just adding to our Stable of Victron System equipment :)


The Orion can be used as either a Charger or as a Converter ( ie. stable DC output ) My plan is to use it to charge the Starter Battery from the House Battery. From everything I have read, it should only go into charge mode when the Input V ( House Battery V) is above a set limit ( set using the VictronConnect App ) and when the Starter Battery V is below a set limit ( again, set in the App )

So basically, this will mean that the charger will try to charge the start battery when the house battery voltage is above it's float value and if the Start battery is below it's Absorb value.

The House battery V goes up when it's being charged. ie. If the engine is running, the Multiplus is charging or if there is sufficient Solar to charge the House Battery. 

If that concept is incorrect, then there are other choices such as a manual switch to turn the Orion on, or the Engine Detection System override which would turn the charger on when the Alternator is running. 
Whichever method I end up using, it should involve keeping the existing Alternator to house Battery connection. I plan on upgrading our House Battery bank from Flooded Lead Acid to LiFePo4 batteries later this year/ early 2023. Their cost has dropped significantly in the past 5 months. Right now the Chin Batteries are looking good.

This diagram is modified version of the one in the Victron manual for the Orion.


This shows the Source ( Input ) supply being the House Battery and the Charged Battery being the Start Battery.

The Start battery is just a couple of feet away in a straight line, perhaps 6' around the bends from the other Victron Equipment. So I plan to install the Orion on the bulkhead adjacent to the Multiplus.

That will enable a short run of cable to the Positive Bus Bar and the Negative Bus Post, for the Input cables. The output will pass through the bulkhead adjacent to the Multiplus into the locker where the Start Battery is located.


I'll mount a 20Amp fuse on the +ve Bus Bar to the input of the Orion and a 20Amp fuse inline of the wire from the Orion to the Start Battery +ve.  The Start & House batteries share a common -ve. Victron don't make the 18Amp Orion in a Non-Isolated version and I understand that it's ok to join them, so there will be a wire from the -ve in and the -ve out to the -ve Bus post.

I'm curious to see if the Orion shows up in the Victron VRM if it does, then I should be able to view the charging history online. That would be cool too.

Ok, waiting on the arrival of the Orion, I have everything else. The max wire size for the unit is AWG6 
The Wiring calculator shows 14AWG but I'll use 10AWG.


Wednesday, September 28, 2022

Universal M25-XP Alternator Support Arm Failure - Again

Universal M25-XP Alternator Support Arm Failure - Again

Twice in the past 7 years, I have purchased a pair of OEM Support arms for our Alternator on our Universal M25-XP Diesel engine, I have one left and have no reason to think that it will last as long as the others, in other words, failure is imminent. 

When they fail, they break near the top attachment slot and, luckily, it has not been a disaster. When they break, the arm falls down about an 1/8" of an inch, not much, but enough for the arm to rub against the Coolant piping and the potential rupture of the pipe and consequential loss of engine coolant. That could be a disaster.

I went to a local machine shop and described the problem and taking the last remaining arm with me to use as a template.

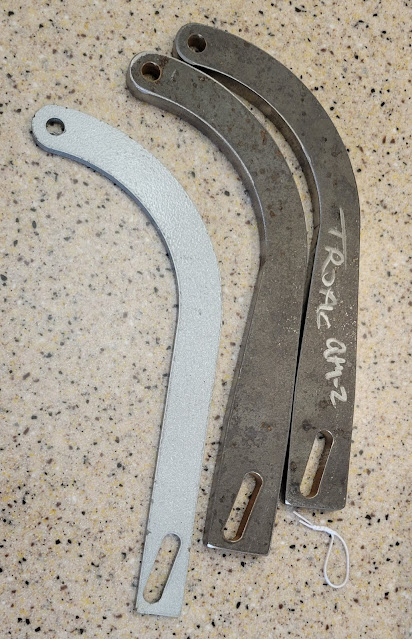
My request was to double the thickness of the arm from 3/16" to 3/8" and to expand the width at the slotted end by a 1/4" They did a great job.

The Gray arm is the original


The Original is laying on top of the new arm

Just spent a few minutes cleaning the surfaces with a nylon sanding pad, clean with Acetone and  then a couple of coats of spray High Heat Resistant Rust-oleum paint followed by a couple of coats of Rust-Oleum Metallic paint ( just happened to have some of that on the shelf) .  

L-to-R Original, Primed, Finished

Should be able to get down to the boat on Friday to install one, the second piece will get wrapped with clingfilm and stored on the boat with all of the other engine spares.

They were not cheap! The new arms cost $150 for one and $200 for two, but they now have a Drawing of them incase anyone wants one or two.

If you want one ( or two) reach out to them. The invoice number is 25326 for reference.
Tropic Marine Products
217 SW 29th Street
Fort Lauderdale FL 333015
Phone: 954-779-7038

I'm not getting any compensation for promoting these, but I know that so many Universal M25-XP owners have had similar issues.  

See you on the water.

Wednesday, September 14, 2022

Installing a Balmar MAX Charge MC-618-H External Alternator Regulator

Installing a Balmar MAX Charge MC-618-H Regulator


Our existing External Regulator is a backup unit from when the Zantrex Power Management System was installed, now replaced with our Victron Power Management System. The old external regulator does not have the features to protect our Balmar 6 series 100A Alternator nor does it consider the battery temperature nor the Battery Voltage. The Balmar MAX MC-618 does ( The H indicated that it is supplied with an electrical harness.)

I purchased the regulator from PKYS online and was surprised that it's cost was competitive with Amazon and it's delivery was at least as good, it arrived early.  When it arrived, I thought I had the wrong item. I sent an email to PKYS explaining that they had sent the wrong item.

But!!! As you can see from the picture above, it's identified as a MAX Charge MC-618 not as an MC-618-H, I found that the label on the underside of the regulator shows it's a MC-618-H I and sent a follow up email to PKYS apologizing for my mistake.


I read through the manual again and realized that I didn't order the two Temperature Sensors, Duh! I placed another order for them. After placing the order, I called PKYS just to make sure they didn't react to my first email regarding the wrong item. They actually picked up the phone and responded to my query. Very helpful. The order for the two temp sensors arrived a day earlier than expected ( ordered Monday arrived Wednesday )

As I mentioned, I read the manual. It's online but I downloaded it and stored it in my 'Manuals' folder for future use. I'm going to print it to keep  on board with my other manuals, just in case I'm ever out at sea and no net connection.

Ok, Onto the Installation.

My plan is to keep the existing dumb regulator as a backup, it works, just not very efficiently.

Here's the rough process:

  • Install the Regulator ( 4 screws ) adjacent to the old regulator.
  • Run the wiring harness into the engine area and connect to the Alternator
  • Run the Alternator Temperature Sensor wiring to one of the Alternator Body Nut-n-Bolt
  • Run the Battery Temperature Sensor beneath the engine area Port side into the Battery bay just forward of the Galley forward bulkhead ( about midships )
  • Run a cable for the Battery Voltage Sense wire alongside the Battery Temperature sensor cable.
Sounds pretty straight forward. Next it's time to program the regulator. I'll need to turn the engine ignition on for that. But first I have to do a bit of work on the Alternator housing.


On our 100nm trip to Lake Worth and back over the Labor day weekend, the engine kept showing intermittent RPM although it sounded great and was running very steady. 

Turns out it was the Drive belt lose again!  I went to Broward Bolt and got a few of these Nord-Lock washers used to keep Turbo Units on cars & trucks from shaking lose. 

I need to adjust the belt tension and lock the bolts in place with these washers.

FYI, I make a point of going to Broward Bolt as soon as I need any type of bolt, nut or washer! 

1560 N Powerline Rd, Pompano Beach, FL 33069

The staff are awesome, they have never been out of stock for anything that I needed and have always been really helpful. Must admit, when I first went there a few years ago, I was expecting they would be expensive but happily surprised that their prices are very reasonable. They are not sponsoring me at all, I just feel the need to promote really good customer service. Give them a call next time you need Nuts, Bolts or Washers ( and drill bits, hole saws and two part epoxy mixes - the type in Tubes like Caulk ) (954) 960-1740


Here's the wiring diagram for this project.


OK, we're headed down to the boat in the morning, I'll try to take a bunch of pics of the install and Alternator Tensioning.