Saturday, March 5, 2022

Temperature Monitoring Hot and Cold

Monitoring our Boat's Fridge/Freezer and Hot Water tanks.

Our Fridge/Freezer has an adjustable Thermostat but no temperature indicator and there's no temperature indication for the Hot Water Tank. The fridge/freezer temp is important, we don't want our frozen food (think Klondike Bars) to defrost and don't want to waste fresh water running it until hot water (if there is any) to find out if it's hot enough for a shower.


Solution: Install a Dual Temperature display.

This one is from Amazon, $15

"WIDE TEMP RANGE - Temperature Range -58 ℉ ~ +257℉(Fahrenheit); Temperature measurement accuracy: ±1℉ (±0.1℉ when temperature within -9.9~99.9F). It can be not only used in water but also used to measure the air temperature. But the water temperature will be more accurate than that of air."

It's a small display, Size: 48*29*22mm. The probe wires are just 3' long, but some of the reviewers modified them to extend further.


Plan is to mount one Probe on the side of the Freezer box in the Fridge/Freezer and the other inside the thermal jacket of the Hot water tank.

As often is the case, determining where to locate the display is the challenge. The preference is somewhere that is visible without having to move anything or crawl/stoop down to some awkward position, but also away from any moisture, so not by the counter top.

I'll drill a small hole in the side of the Fridge walls and lead the wire for the probe outside of the insulation. The hot water probe will simply slide between the internal hot water tank and the fiber insulation between the tank (round) and the outer casing (rectangular). I think that the whole tank will need to be removed in order to insert the probe. There is a small area by each of the pipe attachments that I could possibly use, I'll make the decision when I get down to the boat and start on this project.


The unit has 3 connections on the back, one for each probe, the 3rd is for the power supply.

It draws about 8-9mAmps at 4v approximately 0.32Watts.

With a voltage range of 4v to 28v, the voltage drop over the power cables should not be an issue, I'll run power cables from Connection to the Compressor with an inline fuse. I'll use 16awg cable as that is the minimum size recommended by the ABYC.

This does mean that the Hot Water temperature will only be displayed if the Fridge/Freezer is powered on, but if we're on the boat and thinking about taking a shower, then the fridge/freezer will definitely be turned  on.


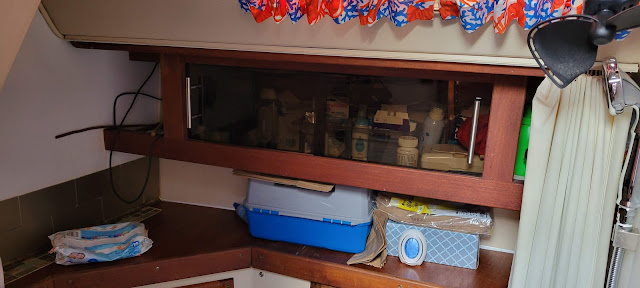
Back to the issue of where to mount the Display. There's a wooden panel that covers the midships water tank vent pipe on the forward side of the Galley  storage shelf. It would be easy to remove that panel, mount the display, connect the probes and power supply, replace the panel and we should be in business.

(The red arrow points to the planned display location)


Got down to the boat today and viewed the Probe location options.
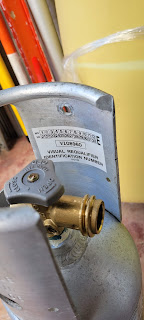
Seems like the probe for the Hot Water Tank will fit by one of the 4 cutouts in the outer case of the Hot water tank. I should be able to slip a probe in touching the surface of the tank and use a couple of cable ties to secure the wire to the hose. I'll add a piece of tubing to insulate the wire and then feed it into the loom that goes up behind the sink area.


Just another fun piece of technology, an easy project. 


It turned out removing that wooden panel was easy, not sure if it is original boat woodwork though.

Easy cut out, drilled each corner than used a Fret Saw to cut out between them. 

Fits like a glove, the side 'Buckles' actually reach to the back of the panel, so it snaps in very securely.

Now to make the extension leads for the Power supply. I made the decision to get the supply from the Refrigeration Unit just forward of the Midships Water tank on the Starboard side. That's about 10'.

Next job is to extend the power cables and the cables on one of the Probes as it is too short to reach the Hot water Tank.

I'll do that at the boat. The wires will be Butt Connected and waterproofed with Sealed Heat Shrink tubing. I have not seen the power connection at the Fridge Compressor unit, need to take photos of that. 
The Fridge compressor unit is located just forward of the Midships water tank, getting to it will require some boat yoga effort.


Display Test

Here's the display setup on my workbench. I have an old 12v Power adapter (6amps) that I use to test gear at home.

The hot probe is in a cup of hot water, the cold probe in is air, the cold temp is actually my garage temperature, I'm wearing a sweatshirt, this is South Florida on January 29th 2022 !!
The temperature change reading is quite slow, it takes a while to register the increase although it does display the change about every 1 seconds. 


After sanding the panel and a couple of coats of varnish, it looks a whole lot better.

Our long term plans include lightening up the cabin by refinishing the wooden surfaces, there's a lot of wood, some of it will get painted. 
The ideas is that if the surface is smoother they will require cleaning less often due to mold growth which really is a problem here in South Florida.

I'm pretty sure this wood is Teak, it's much prettier without the darker varnish and years of exposure, most of the boat woodwork is that original dark finish, lightening up to match this finish will make a big difference.


This is the 'varnish' that I have used on the Companionway Steps which look great, it looks great on this display panel too.

Minwax Water Based Polycrylic Clear Satin


Day 1 of the installation.

Saturday January 5th 2022
The panel fit just fine, that was easy :) 
First wire to run was for the Hot Water Probe, I cut the Probe cable, it has two black wires, one was printed with white text. I connected the Red side of Black and Red Tinned Copper wire 16awg with Butt joints and then fed the other end of the twin wires along an existing loom under the sink over to the Stbd side below the Fridge/Freezer and up where the Water Fill Hose and the Tank Vent pipes ran and out to where the display is fitted. That took about an hour and a half and a lot of boat yoga.

To connect the Cold probe, I'm going to drill from the fridge forward wall, through the inch or two of insulation and then through the stringer which is outboard of the galley forward bulkhead. The probe wire is only 30inches long, so I'll probably have to extend it the same method as the hot probe.

The power to the Refrigeration Unit is connected via a screw down wire clamps, not really suited to adding two additional wires, so I'm rethinking the power supply. There's a Lighting power cable just above the Display housing, so I'll use that for the power supply just using a pair of electric cable connectors.

Looks like it will take a couple more hours to complete.

Moving ahead. I snipped one of the Probe cables and used Butt joints to connect it to a length of Twin 18AWG wire. Fed the wire from the Hot water tank end along the existing loom to the Stbd side just aft of the midships water tank, then up using a fish tape to through the existing wire holes just forward of the galley fridge/freezer and then aft to the Display unit. That took about an hour but looks neat and is supported every 6-8" 

Next I drilled a hole in the forward bulkhead of the fridge freezer near the top and as far outboard as I could get my cordless drill, it was only about 3" from the inside of the fridge  freezer to the forward bulkhead (Hull Rib). I fed the wire my from the inside the fridge and was surprised that it went straight through first time! Sweet. Then I followed the existing loom which included the probe wire from the hot tank, up to the display unit.

Last part is to hook up the power. The lighting circuit in that area has a lot of connections, sadly, some that I have added. So I'm going to rework all of those and put them to a small terminal block mounted on the upper side of the cabinets. Those wires provide power to the LED light over the aft salon table seat, the two LED lights over the Galley and the Fan over the galley. My plan is to move all of the Fans to a separate circuit (we have 4 Fans and a 5th to install in the aft berth). Meanwhile, I'll just connect the Temperature Display unit to the Cabin light circuit. I have much bigger fish to fry. (stay tuned for an upcoming intro to that upgrade)


Ok. Here's a pic of the probe mount inside of the Fridge.

That pic shows the metal temperature probe secured to the outside of the freezer box using a cable tie hold down clip that is mounted on the separation ferrules. It's really difficult to see from looking down into the fridge/freezer but it's very secure. I added a strain relieving cable tie to secure the wire to that ferrule too.

That method alleviated the need to drill a mounting hole in the surface of the fridge/freezer box itself.
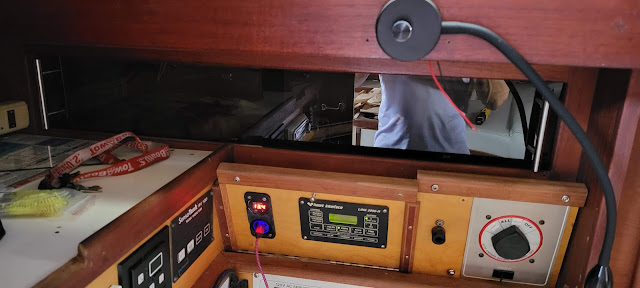


All done!

The final wiring was pretty straight forward, it is connected to the Lighting circuit.

Right now the Cabin temp is 81º F so the hot water tank is actually cooler! 

The Fridge/Freezer (blue) temperature is set for max cooling, and the display varies from 31.3 (as shown) to 8ºF when the Compressor is running.

We'll see how the hot water temp shows when we next run the engine.

Ok, sign off on this one.

Oh, the lighter finish of the woodwork is appreciated by the Admiral. It's a winner.


See you on the water (we are right now, rafted up with 4 other boats from the HISC in Lake Boca)


Tuesday, February 22, 2022

Replacing the Sliders on Eximius

Replacing the Cabinet Sliders.


The sliding doors that keep stuff inside the cabinets in the Head, Galley and above the Nav table may have been abused, damaged and some replaced over the years, it's time to bring them all up to a decent standard (mine).

I removed the old sliders, not as easy as it would seem. The old doors were not all the same size height and had to be persuaded to leave the grooves where they have lived for several years if not forever.


Two of the handles were missing, they broke off before we owned Eximius. 
These were from Amazon, pack of 10 for $40, they're actually very nice and the sizes seemed to be just right.


I took the old sliders down to Prospect Plastics, six in all along with one of the new handles.

Prospect Plastics needed a week to finish the new sliders including drilling the handle holes, total cost was $72 plus the $40 for the handles from Amazon.

The Head Cabinet with Sliders installed


The Galley Storage with Sliders installed


The Nav Table shelf sliders installed.
The Electrical pane is partially open in this photo.

It was a quick job really. Took more time to remove the old sliders as they were not cut very accurately and difficult to get them out of the grooves. I had the new plastic sliders made 1/16" shorter, they fit snug but are a lot easier to install. They are also 3/16" thick compared to the 1/8" originals.


Cross that one off the list.

See you on the water :)


Gas Bottles Recertification

 One of our Gas Bottles Leaked when at the refill station.


Eximius has two Propane Tanks, they are the Worthington Aluminum 6lb tanks, I had to change out the empty tank on board over the New Year's Eve Cruise and so had to take it to get refilled. The Propane station in Margate reported that the tank leaked, the guy demonstrated the issue. Needed to get a new valve. The Bottles cost over $200 in a good year, right now they are not available and on back order till June 2022.

We normally take the tanks to Ameri Gas in Fort Lauderdale, but when I asked them on the phone if they could replace the valve and recertify the tank, they informed me that they were only able to refill, all of their techs and office staff were out due to the pandemic, sounds a bit iffy to me.

I found the valve online and ordered one, also watched a YouTube on how to change the valve, it was easy, ok, easy in theory, difficult in practice. But with a bit of sweat I was able to change out the valve. 
The tank was new  in 2006, and apparently it has to be recertified after 12 years and then every 5 years. I had both tanks recertified a couple of years ago, but I'm pretty sure it was a rip off, there were no labels applied to the tanks.


The new Valve came from Nash Fuel via Amazon, it arrived ahead of schedule.

I always wondered what the inside of the valve looked like.

The attachment thread is on both the inside and outside of the valve so it fits our older style fitting on board as well as the newer style fitting on our Gas Grill at home.


The new valve installed, now I just needed to get the tank recertified and filled.

We found a company 'Hogans Gas' in Lake Worth that could do the refill, recertification and in a single trip. It was well worth the drive up there.

It cost $30 to get two tanks recertified and the empty filled, the second one was almost full, so they just recertified it and topped it up with Propane.

The guys at Hogans Gas were very polite, helpful and happy to share tips.

It turns out the Cylinders need to be recertified every 5 years from now on.

I'll put a note in my calendar.


As it turns out, I needn't have taken the trouble to change out the valve, Hogans Gas would have done it with a lot less sweat on my part.


So, we're all gassed up for the St. Pats Day Cruise. Hope to see you on the water.


Wednesday, February 9, 2022

Lost Engine Key


We lost our Engine Key

We had just done some testing of the boat's Battery Charging System as it was not charging the house batteries. Part of that test was to see if the Batteries were being charged by the engine Alternator.
I opened the engine raw water valve and Peggy went into the cockpit with the key to start the engine.

Oh! When we got to the boat today, I replaced all of the rusty hatch padlocks with Combination locks and I threw the old locks and their common key in the garbage, just before the garbage collection trucks arrived.

When Peggy tried to insert the key into the engine control panel it would not turn! It was the wrong key.
Did I toss out the wrong key? 

Of course, we have a spare, of course it's on the boat, of course.

Nope! What I thought were spare engine Ignition keys were not (I know, it's a diesel, there's no Ignition, but the key controls the Engine control panel start button, Glow Plug Button, Blower Button and the Panel Lights.)

We dug into all of the obvious places, Nav Table, Key hooks, pant's pockets, I even went out to the car to see if we had put a spare there. During the search for the missing key, I found 3 spares, but they were not the engine control panel key! Grrrr.

Peggy was trying every key we found even those that were obviously not the right key. But one did fit and it did turn and it did allow us to start the engine.

It was at that point that Peggy reminded me. The last time we took the boat out, the engine overheated because I didn't open the Raw Water valve. After that fiasco, I was reminded that some skippers put the Engine Control key on the Raw Water Thru hull valve - to act as a reminder to open the valve before trying to start the engine. I had removed the key from the boat's general key set and put it on a seperate floating key fob so that I could hang it on the Valve.

DUH! We found the key exactly where it was supposed to be, exactly where I was supposed to look.

Today I went to Lowes and had 3 spare engine control panel keys made, we have a second for on the boat, another on my car key ring and a 4th on Peggy's key ring.

I'm guessing we'll remember where the key is next time we want to start the engine.

Oh! The Battery charger - Failed :(  The Zantrax Freedom 20 Inverter Charger is least 18 years old and not worth fixing. I'll post another article about that.

Meanwhile, we can start the engine and charge the batteries because we know where the key is located. 

See you on the water (if we can find it ;)

Paul


Saturday, January 29, 2022

Saving Zippers - Thanks Peggy


The Zippers on both sides of the Cradle Cover mast wrap were jammed and the Zip pulls would not move up or down and keep the zipper closed! Grrr. Looked like I would need to remove the Cradle Cover (not a simple task) and replace the zips. I have the gear to do that, even have spare zips.

The old zippers are PK #10. I use YKK, I tried to use a YKK #10 Zip pull to replace the PK Zip Pulls but still could not close the zippers. I was ready to start removing the Main Sail and the Cradle Cover when Peggy suggested that we could replace the PK Zip pulls.

Peggy scored an 11 !! I purchased two Stainless Steel PK #10 Zip Pulls online.

When they arrived, I tested one, using it to zip the two sides of  the front panel together, WooHoo! Worked beautifully.

Back at the boat it took about 10 minutes to replace the two old PK zip pulls with the new Stainless Steel items. Another 5 minutes and I had installed Zipper stoppers on the ends of all four zip sides (two each side) 

Thanks Peggy! I was convinced that the zippers were damaged from 5 years of UV exposure, but your idea worked great. 


Gotta love a great boat partner 😍

Wednesday, January 12, 2022

The Scoop on Poop in Fort Lauderdale

Pump outs are an issue in the Yachting Capital of the world - Fort Lauderdale.

Lack of Pumpouts in Fort Lauderdale Florida

It's a crappy subject but boat owners have to deal with it. It's not something that can be left to rot, it will.

Locally there are not that many Pumpout Stations and there are fewer still that work. For us, the most convenient is at Smoker's Park on the New River just downstream of 3rd Avenue Bridge. We have used that facility many times. There are a bunch of boats that are tied up along the river there, notably, Musette II and a few others, they all have a need for Pump outs. If they don't pump out at that locale, they have three choices:- #1 Call a mobile Pump Out service, it will come to them either at the dockside or alongside their boats.  #2 Go to another pump out station, good luck with that one! or #3 Head out to the Ocean and 'pump and dump'

In our case, Eximius holds a maximum of 25 gallons. In fact, if we had 25 gallons of poop on board, it would probably be making a mess in our bathroom as it would flow back - Yuck! So we pump out frequently. We have the same choice as those boats tied up at the New River:- Use the shore based pump out service (DIY), hail a mobile pumpout, head up to Los Olas Marina (apparently not working and unlikely to be fixed until the rebuild of the Los Olas Marina (Sentex managed now) or we can go out on the Ocean.

Ok, so what is the process if we want to pump and dump out on the Ocean?

It's pretty simple. We head out to the 3 mile limit off shore, normally we go quite a bit further, and open the valve that is normally wired shut, turn on the Macerator Pump and whatever is in the Holding tank is pumped overboard. It might not be obvious to everyone, but on our boat, nothing goes into the head that we didn't eat or drink. No TP, no napkins and very very little fresh water. The salt water flush in our boat has been disconnected. Salt tends to cause cakes (now there's a thought you'll not easily forget) to form in the hoses and the tank.  This means that we create a lot less sewage on the boat than we do at home. A typical flush on our boat is perhaps a pint or two of fresh water. 

So our poop gets macerated before it's discharged overboard. Surprisingly, although the trail of effluent is visible over the stern of the boat, it's no longer visible within a few minutes. A boat trailing us would probably not notice that we dumped if they were sailing more than 3 or 4 minutes astern of us.

Ok, so that's the scoop on poop. It's a sad reality that there are so few public pump out facilities in Fort Lauderdale - Yachting Capital of the World.  Of course, Cruise Ships probably have sewage connections at their docks. I cannot imagine how large their holding tanks must be. HUGE!

Anyway, we have been unable to get out to Sea for a while, issues with the boat etc. But we did get to take the boat out for the New Year's Eve Cruise - Thursday, Friday, Saturday and returning Sunday.
The Smoker's park pump out facility is not working, it's not been working for months. One would think that with all of the Sewage that has leaked into the New River in the past couple of years, literally Millions of Gallons of Poop, that the City of Fort Lauderdale would be making extra effort to provide adequate pump out stations. You would think, Right?

Today we hailed a mobile Pump out company to empty our small (25gallon) holding tank. Chris from Mobile Pump Out Service came to our boat today and took care of business, that's #2. As his card says, they are #1 in the #2 Business.

Chris brought his truck and parked it in the road, ran a hose to the boat and quickly pumped out Eximius. Our tank was only half full and I wanted to rinse off the side of the tank (inside) adjacent to where the Level Sensors are located in order to improve their reliability. Chris was ok with me running a hose and spraying that inside of the tank, he suggested that I also spray the area of the tank that is further from the pump out point near the bottom aft corner of the tank.

Chris' rates are very reasonable, he's a cheerful and sensible business owner. He took care to make sure the work area was clean. I had setup the pump out adapter into the deck fitting. Chris said it wasn't necessary but he was happy to connect his hose directly  to the adapter. Boat owners do not need to install an adapter, Chris has a push in adapter that he normally uses.

So we're MT, no longer full of S#!t even if we did have to pay for the pleasure.  Once the current series of Northerly's pass though, perhaps a week, maybe two, we'll be back out on the water. Of course there's a few little projects to do while we wait.

If you need to get Chris to take care of your #2s, then you can reach him at 954-406-6680 or www.marinewastepumping.net


See you on the water.


Tuesday, January 4, 2022

Raymarine Auto Pilot - Upgrade review

Raymarine Auto Pilot - Upgrade review

I'm normally pretty easy on reviews of boat equipment, but I have to step it up with my review of the Raymarine EV100 Autopilot that we installed this year.

The installation - Here's a link to the install process, but here's a quick overview.
  • I planned the install in great detail as it was an expensive and complex install due to the existing wiring on the boat.
  • The old Autopilot was suffering, turns out it was probably due to bad wiring of the original install whenever that was done, before my time owning the boat.
  • The install was done in the summertime here in South Florida - yes - Sweaty work.
  • All of the existing navigation equipment was rewired.
After finishing the install a few months ago, we did a dockside test with the boat tied fast to the dock.
That basically consisted of calibrating the Wheel rotation. Once complete we set the wheel pilot to Auto and then adjusted the heading to see that the wheel turned in the correct direction, a simple test, but it sure gives a greater degree of confidence in the complete installation.


Ok, fast forward to the New Year's Eve Cruise on December 30th 2021. We left the dock at 6:15am dawn was just breaking, we navigated down the New River and passed all of the bridges, the last being the 3rd Avenue Bridge, from there is was simple motoring down the river then North on the Intracoastal Waterway, there were only two bridges we need to pass to get us from the River to Sunrise Bay.

I took the opportunity to turn on the Autopilot once we passed the last bridge on the New River. Initially the controller complained that there was no drive unit found, turned out that the Autopilot was not powered on, but the instrument was via the NEMA 2000 Network. Peggy turned on the Autopilot at the Electrical control panel by the Nav Table in the Cabin. 

Now the Autopilot started to obey the commands at the Helm Station. There are 4 heading control buttons:- -1º +1º, -10º, +10º. As soon as the Autopilot was put into Auto mode, the wheel drive motor took control of the Helm. Pressing any of the heading control buttons changed the heading very quickly, it was a quick as if I had manually tried to change the heading by rotating the Helm. I must admit, I was impressed! I was able to navigate all the way from 3rd Avenue bridge to the Las Olas Blvd Bridge - there I took the pilot out of Auto and manually steered through the bridge where the current was pretty heavy and there was other boat traffic the really required manual control.

Again, when we passed the Sunrise Blvd Bridge, I went back to manual operation. After the last bridge, Peggy took the helm with the Autopilot in Standby.

The old Autopilot would very slowly react to a heading change request and would often just stop steering, it was not reliable. We tried to steer via the Autopilot but had to keep a close eye because it deviated from the desired heading every few minutes. The Helm wheel would move with exaggerated turns and confidence in the Autopilot system was zero.

The new Autopilot is amazing so far! It responds immediately to a heading change request and does not make exaggerated wheel movements, in fact they are quite fine movements. We have had other people sail on Eximius, and they would not make such fine movements of the wheel despite instructions on how to hold the wheel and make small but early trims of the wheel to keep on course.

Beneath the digital heading display on the Control Instrument, there is a text bar that indicates when the system is detecting local magnetics, every now and then it would change color but it pretty much stayed visible on the first day of use.

After a great New Year's Eve cruise with the Hillsboro Inlet Sailing Club, we left Sunrise Bay at 7:15 Sunday Jan 2nd 2022. Once past the Sunrise Bridge, we put the Autopilot to work again and easily navigated to Las Olas Blvd Bridge, manually steered past the raised bridge and then back into Auto.

As we continued up the New River, we heard from the FEC Railroad bridge that it was going down in 6 minutes. I called the bridge tender asked how long he expected the bridge to be down. 14 minutes.
At the rate we were travelling though the flooding river, we would be at the FEC bridge before it opened. So I decided to do a few Doughnuts downstream of the 'Tunnel' to pass some time in order that we don't end up trying to hover back from the approaching bridges. I probably made 5 or 6 doughnuts, just turning to Stbd by adjusting the heading via the Control instrument. 

During this maneuver the Control Instrument display changed completely. It displayed a message stating that the system had completed the Magnetic evaluation. WooHoo.

After accepting that info (OK) the screen returned to the normal display and the Detecting Magnetics notice was no longer visible.


We have yet to complete the Commissioning process and that requires that we are in an area that is free of obstructions (like the sides of the New River!) as we have to let the Autopilot take charge.

The Autopilot has a learning curve (the pilot, not me!) and during one phase of the commissioning process the Autopilot follows a track similar to the one shown here. We'll have to be on the Ocean to do that, it's far too crowded on the New River and ICW and the lakes are not big enough as well as normally being occupied by many boats.

I'm good with this, another reason for getting the boat out.


So far, my impression of the EV-100 is Excellent! Easy to use, Very Responsive and very conservative in the way it manages the steering.  We have a lot to learn about the system after completing the Commissioning including being able to follow a track (not sure if it will do that, but it has the systems required, just have to make sure that the Raymarine part will listen to the Garmin GPS Chartplotter which provides the data for following a track.)

Right now, I give it a **********, 10 out of 10 stars. I am delighted with the upgrade. Well worth the effort and we both look forward to using it often.


Oh! One last thing! 
Prior to installing the new Autopilot (which includes a Rudder Position Sensor) we had to look down between our legs to see which way the Rudder cap was pointed in order to determine the Rudder Position. It was almost comical, Peggy would be at the helm, I would ask her to go Amidships and she would look down between her legs and turn the wheel till the rudder cap pointed directly forwards.

The New Autopilot has a Rudder Position Display, even if the Drive it not powered up.

The display shows a Red (port) or Green (starboard) block from 0º to current rudder position. 

No more looking between our legs to see the Rudder position. BTW this was only necessary because the wheel required more than 1 turn to move the rudder from fully to port to fully to starboard, so the whipping that we have on the wheel to indicate Amidships is only useful if the rudder it nearly Amidships already. 


Stay tuned for more updates as we complete the Commissioning process and get used to using this awesome upgrade to Eximius.

See you on the water.