Creating the Template
With the Modified Frame installed, time to make the template.
Heading down to the boat armed with:
- Dura Skim - more than enough material
- Double Sided Basting Tape - new roll of 3/8"
- Reinforced shipping tape - plus a spare roll
- Grease Pencil (black)
- Sharpies - Red, Blue, Green, Brown
- Tape Measure
- Note pad
I'm planning on taking at least 2 hours probably 4 to create the template. Sailrite suggests we should use the shipping tape on the tubes as it's easier to remove than trying to remove the basting tape from the steel tubing. We know that works from making our Binnacle and Wheel cover.
The design of the dodger is not yet cast in stone, or should I say, not yet cut in Sunbrella. We'll figure that out when the template is securely in place. But the basic concept is to have four parts. Top piece that covers the top of the frame and a little way down the sides, below the grab rails. Port & Stbd side windows, and Front window. I'm using 40 gauge Strataglass, which should give us really good visibility and long lasting protection from UV. We want to have a way to vent the underside of the Dodger, either by folding a side panel out of the way or rolling up a segment of the front window.
All of the Strataglass will have Sunbrella covers underlined with 'Evolution Block-it' fabric to prevent scratching by the covers. We expect to leave the forward cover on when the boat is at the dock. The side panels will also have covers, but more for storage than when at the dock - we need Sunlight to get to our Solar Powered Vents that are under the Dodger.
The Top panel will be held in place by Zipped pockets. The side panels will be zippered to the top panel and snapped along their lower edge to the cabin top and cockpit combings. The Front panel will also be zippered to the top panel and snapped to the front of the covered area. We haven't yet decided on whether to use a single front window or a 3 part window. If we go with the single front panel window, then to vent we'll unzip from the side panels. If we go with the 3 part window, we'll have a roll up center pane which will be zippered to the top panel and the sides of the front panel. It's really a mater of how it looks and how we see them being stored below when needed. Trying to keep it simple is our goal, but the 40 gauge Strataglass requires a larger minimum diameter when rolled. It's delivered on a roll that is about 2" diameter. We'll see how this goes. I was tempted to get the 30 gauge window material, but we really like the clarity and durability of the 40 gauge.
So, how did it go?
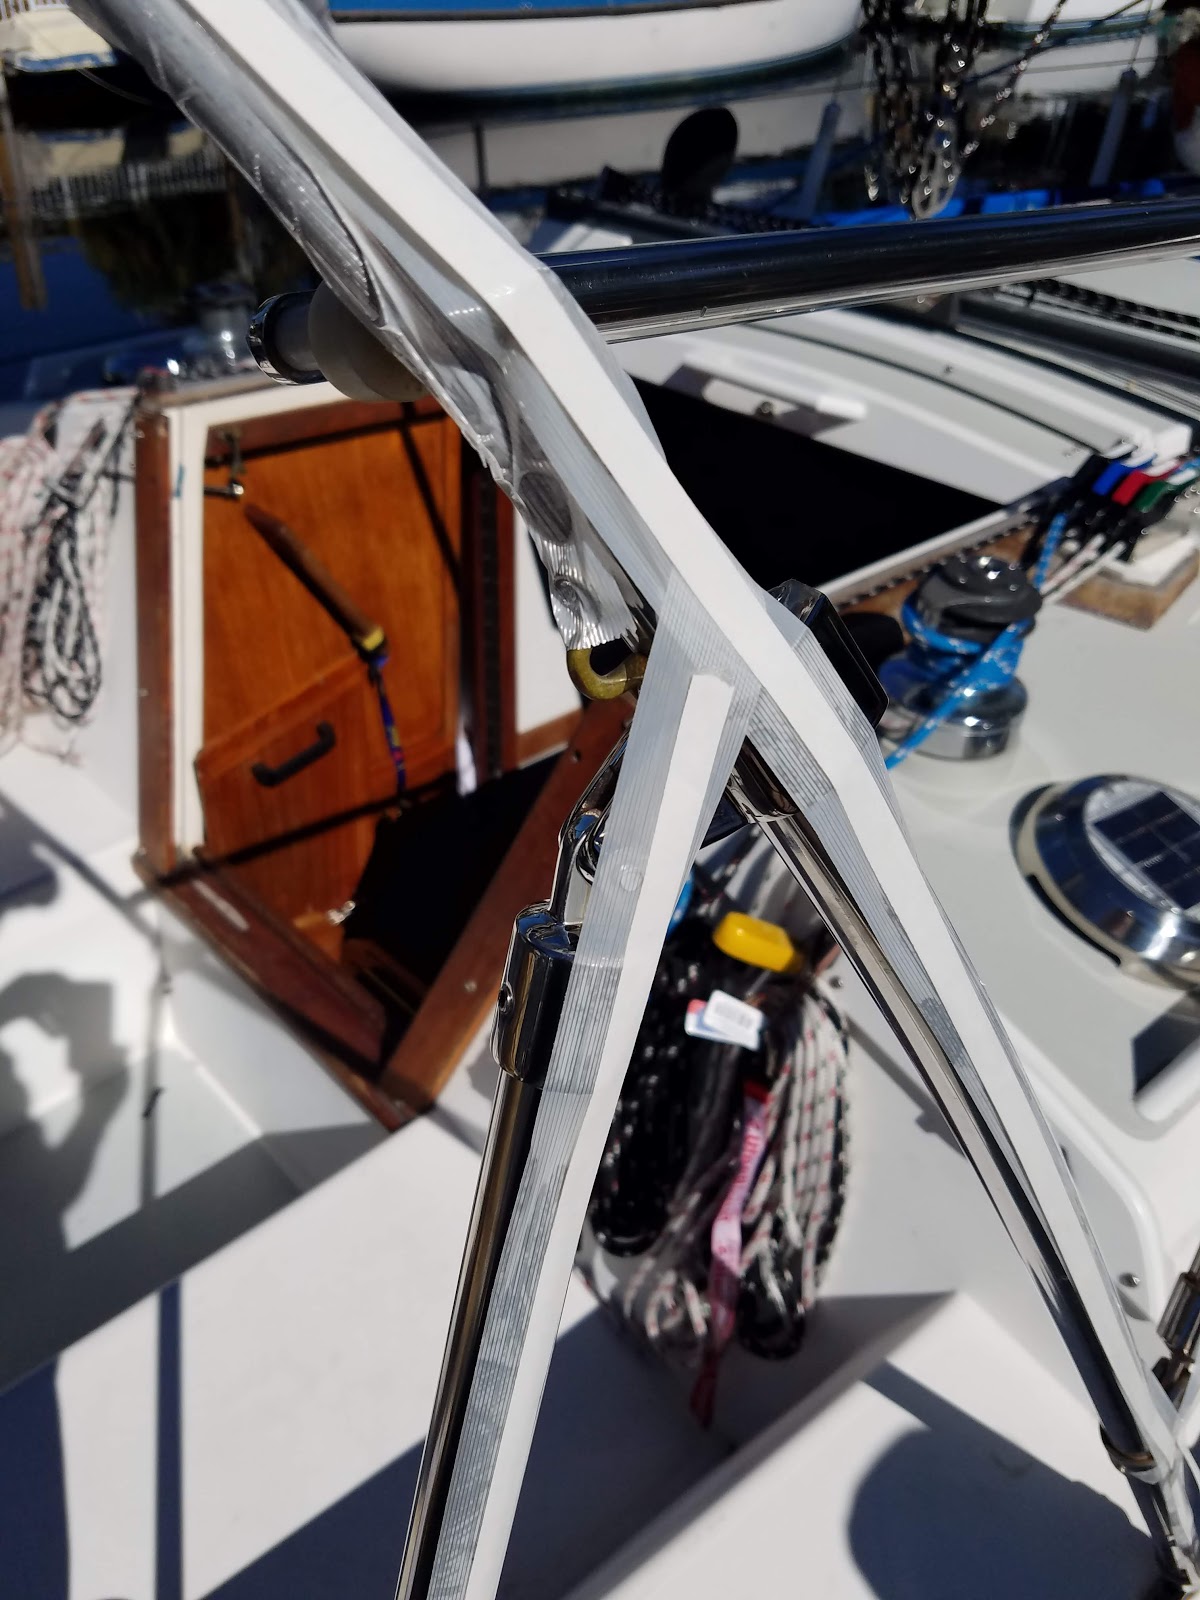 |
| Shipping tape and Basting tape applied to Dodger Tubing |
Reinforced Shipping tape along all the tubes, along the lower sides and along the front of the cabin top ridge.
This uses a lot of shipping tape and even more Basting tape.
But this only took about 15 minutes to complete.
 |
| The completed template overview. |
It took about three hours to complete the template and we have decided on the style.
The top is going to reach about 2" below the grab rail.
The front panel will have a strip of canvas at each side that will form the connector to the side panels. It will have cut outs for the lines that are led back to the cockpit.
The front panel will also have canvas for about 6" up from the deck ridge on the cabin top, with shaped tabs where the Quad Spinlock line clutches are located. the lower edge of all panels will be lined. The front window will be zipped into the front panel along the top and down the sides of the front panel.
 |
| The Gib sheet will run outside of the side panels |
The sides will zip to the top and reach down to just below the combing and aft to the new aft support bar deck hinge.
The aft edge will not be attached to the support bar, that will allow boarders to grab hold of that bar. Instead, the aft edge will be secured with tension straps to the bar.
 |
| Lower edges of Side panels to clear the Catalina 34 Logo. |
The lower edge of the side panels will be snapped to the sides of the combings, and shaped to rise over the Catalina 34 Logo and run just aft of the side windows.
 |
| Side panels to clear the side cabin windows. |
Despite the many snaps that already exist, we will probably have to add a few to prevent the side panels flapping against the surfaces.
 |
| Front corner of the Side panels will need snaps |
The front lower corner of the side panels will need a bit of sculpting to make sure they match up nicely with the front panel.
 |
| Shore power cut out needed on Stbd side panel |
The Port side panel will need a cut out for the location of the Shore Power connector.
I plan on using a straight edge to straighten the lines before using the template to mark up the Sunbrella Fabric.
 |
| Top aft rail hinge connecting Aft support bar |
Boo Boo. The aft connector for the support bar on the Port side is above the old tension metal strap and the Stbd side is below the tension metal strap.
I should have noticed that when creating the template. If I lower the connector to below the metal strap, that will require that the lower deck hinge is moved aft but right now both hinges are equally distanced from the winches.
I checked the measurements and the straps are the problem, they are at different heights on both sides. So this is not a problem
 |
| Top of Front Panel |
We were pretty pleased with the tension we were able to set into the template material (Dura Skim)
I marked the center line of the top tube onto the Top panel, and then applied more basting tape before setting the front panel template. Then marked the center line of the top tube onto the front panel.
We stood back and reviewed the template and decided on the position for the windows
Visibility should be greatly improved. With the Frame set at this height, 7" higher than before, and with the modified front panel design, we can see forwards much better. Peggy can see under the Dodger and I can see over it if stood up straight, and under it if relaxed. Looks like we have a plan.
 |
| Tubes after removing tape |
It was easy to remove the four template pieces, but the shipping tape decided to really grab the stainless steel tubes.
We'll have to go down to the boat just to clean off the residue.
As it happens, we'll also do some plumbing to repair a dripping leak from the hot water connection to the faucet in the head - not my favorite place to work! It's Cramped.
All in all though, today was a good day, I'm very pleased with the templating process, watching those videos on line from Sailrite.com paid off big time.
Next step is to clean up the lines on the templates, decide where to have the edges and hem allowances.
We'll add a zipper to the aft edge of both side panels for future enclosure attachment.
Making progress.
Won't see you on the water for a few weeks. Now is the exciting bit - making the panels.
No comments:
Post a Comment
Got questions or suggestions about our boat, our sailing or our adventures?
Leave a comment.
Thanks.