Our sailing experience on a 1987 Catalina 34 which we named 'Eximius' which google showed as the Latin translation for 'Special'
We hope that our posts will help others looking to take their boat beyond the local waters as well as provide entertaining reading.
I'm a Brit, so my view of entertaining may not match yours ;)
See you on the water.
The Journey Starts Here
Paul
Our Navigation System is pretty good, but I wanted to add some redundancy. Yes we have Chart Books for our sailing areas, I just like to be prepared.
Here's our Current Nav Electronics Inventory.
Garmin 741XS Chart Plotter
Garmin DST 810 Depth, Speed, Water Temperature Transducer
Garmin GMR 18" Radar
Garmin GWind Wind Transducer
Garmin GMI Display
Raymarine EVO 100 Autopilot
EmTrak AIS Transceiver
On a recent trip from Lake Boca to Port Everglades, the Garmin 741xs Chartplotter had an episode, didn't want to play. So we rebooted it. That's when it failed, would not boot up. At the time we were just North of the Hillsboro Inlet which is notorious for shoaling. Our 5'8" draft means we have to avoid those shoals, so monitoring our Depth is a must. With the Chartplotter not functioning, we had to rely upon the GMI display to show our depth. It could do this because all of our Electronics are on our NEMA2000 Network. and the DST 810 is also a NEMA2000 device. Hence we were able to monitor our depth as we went out of the HI inlet, whew!
Once outside on the Ocean, we switched everything off for a minute and turned it all back on. The chartplotter woke up and we were back in business.
But what if our Chartplotter failed and would not reboot! Well, we have a 10" tablet with Navionics and Aquamaps, so we could continue navigating. However, they do not display AIS data so we do not know what the other boats around us are doing. Our Radar only displays on the Chartplotter, so we would be out of both AIS and Radar.
Aquamaps has an interface to connect with a WiFi server but it is not compatible with our Garmin Products, only with NEMA 0183 and all of our gear is NEMA 2000.
I searched the net and thought I had found a solution. Digital Yachts make a lot of electonics products for interfacing boat systems. An email to them resulted in a solution.
Digital Yachts NAVLink2
This is a neat piece of electronics.
Basically it's a NEMA 2000 WiFi Server that translates all of the NEMA 2000 Data to NEMA 0183 and delivers it via a WiFi Server.
The best part is that it works for Aqua Maps. In fact, visiting the Digital Yachts website they have the instructions for interfacing with NAVLink2 to Aqua Maps and it's the first App on their list.1
So this should mean that I'll be able to connect Aqua Maps to my NEMA2000 network and receive the Wind, Depth and AIS data.
Thus it will all be available on my Tablet or Phone!
Now if my Chartplotter fails, we will still have the majority of the Navigation data displayed on the Tablet!
Installing the Digital Yachts NAVLink2
This should be a breeze. The unit gets it's power from the NEMA2000 Backbone, so there is only one electrical connection to make. Simply add a new NEMA2000 'T' onto the backbone and then connect the NEMA2000 Drop cable from the NAVLink2 Server to that 'T'.
The Instructions for the install are that simple, but if you want to customize the setup, then a Laptop could connect to the NAVLink2 Wifi and access the built in webserver to make any changes required.
Of course, Digital Yachts has all of the details on their website. They also have very clear instructions for connecting the Tablet with Aqua Maps to the NAVLink2 server and setting up which data to display.
I had several emails back and forth with the customer support at Digital Yachts ( I'm pretty sure they are in England ) and they were very polite, clear and obviously know what they are talking about. I'll provide the links at the bottom of this post.
Mounting the our Samsung FE 7 Tablet ( 10" )
Ideally, our Samsung Tablet would be mounted at the Helm with the option to relocate it to the Cabin. I purchased some RAM mounts to accomplish this.
This is the Mount. It allows for the Tablet to be held across it's short side but can be rotated so that it is mounted vertically, that's ideal for the Aqua Maps App.
However, this mount on it's own would place the Tablet in front of our Chartplotter. I would rather it be higher than the top of the Chartplotter and not obscure our view when at the helm
The best solution seems to be to extend the RAM mount so that it can be mounted to the back of the Nav Shelf at the helm and positioned above the Autopilot control panel.
I'll bolt the lower part of the RAM mount to the shelf.
This is a RAM extension. It provides a wide choice of locations for the Tablet and will extend the Tablet above the Nav Shelf and the Autopilot control panel.
The Lower end of this extension will fit on the Ball that is getting bolted to the Nav Shelf.
To join the top of this unit with the RAM mount that is detached from the Bottom of the piece shown above to the piece that holds the Tablet, requires another Ball unit.
This is the missing link !
Now all three pieces can be joined together.
I was a bit concerned about the rigidity of the combined pieces, but they are fine. I now have a spare of the missing link because the package from Amazon contained two pieces.
Will probably purchase another base unit so that I can set the Tablet on a shelf in the cabin to have eyes on our Navigation from down below.
The end result:
Wow! I mounted my Samsung Tab 7 Tablet at the helm using the mount and RAM joints as planned. The display at the helm is fantastic,
The vertical position is not so clever so I moved it to be Horizontal and level with the top of the chart plotter. Much better.
The screen is bright enough that I can see it clearly even when wearing my prescription sunglasses.
The picture shows us at Anchor in Sunrise Bay Florida.
Peggy suggests that I get a smaller Tablet, it's a 10" display compared to the 7" Garmin 742xs. I tend to agree but wonder if an alternative Tablet will have the brightness of the Samsung Tab 7.
This was the first time that we have used Aqua Maps to follow a route. It provides the distance and the bearing to the next waypoint on the route, very clear.
We do have a couple of issues with the NavLink2 but they are minor and I'm hoping that Digital Yacht can resolve them.
This is a screenshot of the AIS List on Aqua Maps, there is spurious text data on either side of the vessel names. The rest of the information appear correct when we compared it with the AIS data on our chart plotter.
The list is IMHO easier to figure out on Aqua Maps.
I'll take more screen shots next time at the boat to display more of the AIS features.
In the Aqua Maps WiFi settings the list of connections shows which data items are connected.
Here you can see that GPS data is Off - that's as I set it because I wanted to see that everything else worked if our Main GPS Chartplotter was down. I turned it off.
The depth data is being supplied by our NEMA 2000 DST 810 Depth, Speed, Temperature transducer.
Heading is being provided by our Raymarine EVO 100 Auto Pilot compass header.
Wind Speed & Direction is provided by our Garmin GWind Wired Transducer on the Mast head.
The AIS data is being provided by the EmTrac AIS unit.
This screen shot of Aqua Maps while we are at Anchor in Sunrise bay.
On the left is the data provided by the NavLink2.
Several people asked me how the NavLink works and my simple reply is 'Magic' !!!
However here's what it does.
The NavLink2 is connected to the NEMA2000 back bone via a drop cable which is attached to the NavLink2. All I had to do was remove the NEMA2000 Terminator on the end of the backbone, connect a new T connector to the backbone and reconnect the Terminator to the other end of the T. Then connect the NavLink2 NEMA cable to the T - All done.
Then I turned on our Nav Instruments circuit breaker which powered the NEMA 2000 network. I turned on the Garmin Chartplotter so that I could disable the AIS alarm then turned on the EmTrac AIS system.
With the Nav equipment all running, it was time to connect the Tablet to the NavLink2 WiFi Server.
On the Tablet I turned on WiFi and looked for the NavLink2, found it and provided the password.
At this point I expected the NavLink2 'Status' lamp to change from Flashing Green to Steady Green but it did not happen.
After reading the advise on the Digital Yacht website I rebooted my tablet to make sure no other wifi apps were hogging the system.
Once rebooted and reconnected the WiFi to the NavLink2, I tried to connect Aqua Maps. There's a very clear set of instructions on the Digital Yacht website on how to make the connection. That worked.
Now the List of connections shows up on Aqua Maps.
So that brings us up to date. I'm waiting for a response from Digital Yachts about the flashing status light and the odd chars on either side of the vessel names.
In a nutshell: NavLink2 gets the NEMA2000 data and converts it to NEMA 9183 and transmits it on WiFi, Aqua Maps receives the data via the WiFi on the tablet and displays the selected data on the Aqua Maps App.
Or, as I said earlier - Magic!
See you on the water.
UPDATE
Response from Digital Yacht.
Seems I have a newer model and the Flashing Status lamp is normal. so cross that one off.
They have asked for details about the unit ( firmware version etc. ) So I have to go down to the boat in the next couple of days to get that info. But so far I'm impressed with their post sales support.
For now it's Back to work.
UPDATE
March 23rd 2024.
It has been a busy few weeks and I have not gotten down to the boat in order to respond to DY's questions. But I did get down today to check on the boat after the rain storm yesterday. Didn't get to check on the Firmware version. So it'll have to wait till next weekend. I have a bundle of work to do and finish by April 1st which was just moved forwards to being completed by March 29th. So no trips to the boat this week.
The Plan: Sail down to Billy's Point in Biscayne Bay and meet up with some of the HISC Club member's boats over the Memorial Day Weekend returning on Monday/Tuesday. And have fun doing it.
We had loaded the boat with bedding, food, fuel, water, wine, Rum and Whiskey. We were ready for this trip and the forecast was looking good, any bad weather was expected to stay North of Port St. Lucie.
We started the day early, up at 5am, breakfast of Cereal & Toast, by 7am, we had the diesel engine running and prepared all of the lines to leave the dock. The morning weather report was for very little wind from the South, so going outside on the Ocean would have been a day of motoring with little to no wind. It was looking better to head down to Miami on the ICW.
In preparation for the trip with the option to go down the ditch, I had printed out a list of all the ICW bridges between Port Everglades and the Port of Miami. The list included the bridge names, distance from the previous bridge and it's opening times. The list was at the ready at the helm. So the decision was made to go down on the inside ( sailors down here refer to the ICW as the ditch, or 'the inside' rather than the Ocean route )
The New River bridges close down for the morning rush hour from 7:30am until 9am, so our plan was to leave the dock around 6:15am which would mean that we would get out of the canal within two hours of high tide.
We heard Chris and Kelli on Summer wind call for the Hillsboro Inlet Bridge opening, seems they were going on the outside, we were already down south of Port Everglades, it would be interesting to see how our progress towards Biscayne Bay differed. Later we heard Summer wind call for the Dania Beach Bridge to open, so we figured they had decided to come inside at Port Everglades and continue down the inside. Summer wind is a Catalina 36 and has a larger engine than Eximius, so I expected them to catch up with us by the time we got to Biscayne Bay.
All of the bridges opened as expected except for the Venetian Isle (West) bridge. Our GPS showed our arrival time at the bridge to be at 12:02 which would typically be as it completed it's opining. I called the bridge tender requesting the bridge opening. ( they are not required to open on a scheduled opening time if no vessel has requested it ). At 11:58am, we could see that the bridge was already open. Bridges rarely open early - normally that would be because of a commercial tow or tug or it could be an emergency vessel. In this case it was a Miami Fire Boat, I'm sure nobody would have any issues with the bridge opening early, but I had issues with the fact that the bridge tender closed the bridge before 12:00, noon, instead of remaining open to allow us to pass. We arrived, as expected at 12:02 and the bridge would normally be open fully ( the Bridge tenders routinely remind vessels to stay outside of the 'fenders' until the bridge is fully open.)
So we lost a half hour doing doughnuts on the North side of the bridge, not an easy task as the number of small vessels in the area. That was the third bridge that we missed the opening, due to waterway traffic or just being unable to make the next bridge opening.
Once past Venetian, it was plain motoring past Miami down to the Rickenbacker Causeway bridge.
We did get a good view of the The Centinela del Río, (The River Sentry) by Cuban Manuel Carbonell
Just before the bridge, over to the East is the Miami Marina Stadium anchorage. We could see it was quite busy and more boats were heading East towards it. Just in case Affection was still there as they planned, we called them on #68, #16 and #9 but no reply, so we guessed they were already on their way to Billy's Point. We could hear Summer Wind catching up to us when they called the bridges which we had already passed.
Once past the River Sentry, we followed the ICW channel down towards Rickenbacker Causeway bridge
Just before the Rickenbacker bridge, over to the East is the Miami Marina Stadium anchorage. We could see it was quite busy and more boats were heading East towards it. Just in case Affection was still there as they planned, we called them on #68, #16 and #9 but no reply, so we guessed they were already on their way to Billy's Point. We could hear Summer Wind catching up to us when they called the bridges which we had already passed.
Passing the bridge, we engaged the Auto Pilot once past the bridge and shortly after that Affection showed up astern of us. Able to maintain a higher speed, Jeff & Judy sped off towards the Featherbed channel. We played dodgeball with oncoming vessels, which required us to disengage Otto ( our nickname for the Autopilot) and then reengage it once the power boats passed us.
We had passed through the Featherbeds by the time Summer Wind was visible astern North of the beds. She was sailing to the South East trying to spend some of the trip under sail. Meanwhile we continued motoring with the wind on the nose headed to Billy's Point.
Affection had anchored and we prepared to raft up on their Starboard side, Fenders out, Lines at the read and we approached them with the plan to drop our anchor to the south west of Affection's and drop back to come alongside her. That pretty well went as planned. It took a couple of tries, it's difficult to gauge small distances and we were trying to drop our anchor 90' in front of Affection. But we came alongside without a bump, lines passed over, more fenders hung by Jeff & Judy and before long we were secure alongside. Time for a Shower (hot water curtesy of 12 hours under motor) and a Rum.
Chris and Kelli on Summer Wind arrived and anchored off to the South West expecting that Lady Gray will be close to them the next day. Chris had an issue with his dinghy and spent a while getting that fixed.
Later, early evening, Jeff &Judy came over to share some Cheese & Wine aboard Eximius and so the Socialization began. It's always a big part of the club cruises and always a pleasure to share personal stories.
Friday night was a pleasant period, cool enough to have the hatches open but only if they had screens to keep out the mosquitoes. Jeff complained about them on Saturday morning which was surprising as I'm normally the mosy bait.
Saturday morning we launched 'Special T' our new Dinghy, that was a game! Jeff came over to Eximius and helped up maneuver it over the lifelines. Lesson learned - It's easier to push the boat rather then pull it when launching. I had made up a 20' long 4 to 1 Utility Hoist which we connected to the Spinnaker Halyard. The top block was hoisted to about 16' above the deck, the lower block was attached to the Bow Ring on the Dinghy. It was easy hoisting the dink, but awkward getting it over the side, Jeff helped with that and the Dink was in the water in just a few minutes.
The next challenge was to lower the engine off the mount on our Port stern quarter, the challenge was to get the dink between the two boats rafted together. But again, we got it done and before lunch, Special T was in the water with her engine and I was able to take it for a spin. Special T is no longer a virgin! By the time we were all done, Lady Gray was at anchor off to the North East about 200yds from Affection flying here beautiful flags, they flew straight from the mast as the wind had picked up.
The plan was for the Cruise BYOG (Bring your own grub and something to share) aboard Affection that evening. Judy did us proud! We had eight people at the party and food enough for another eight. Of course the social ranked high among our cruising history. We all wore colored glow in the dark necklaces. Discussions covered everything from the trip down to the Bay, how the boats performed and the weather. We solved several of the world's problems. Jeff & Judy brought 'Tam Tams' a chocolate cookie that few of us had ever heard of. (( Barry was due to work the following week and reported back that he had found Tam Tams in South Africa, while Chris reported that they were available on Amazon
There were a lot more stories that evening, but they are best left for the original story teller to share.
Saturday night was not so comfortable.
The boat off our Port side Stern is Summer Wind - I know, Ironic.
So sleep on Saturday night was troubled to say the least, I was up after midnight looking to see what the noise was. Jeff was up doing the same thing and he eased our stern line to allow the boats to sterns of the two boat to be set further apart. Back to sleep for a couple of hours and then dawn came through.
There was an informal plan to share breakfast on Lady Grey. We confirmed with them. the old fashioned way 'Just holler from one boat to another'. With food ready to go, we all arrived on Lady Gray where Barry & Jamie were preparing a breakfast spread. Before breaking our fast, Barry played the Star Spangled Banner - by Madison Rising. We all stood in respect of Memorial day and all of those that have given sacrifice to the freedoms we have today.
After breakfast, with the Sun out, power boats were arriving at Elliott key and Billy's point (which was about a mile from our location) Jeff & I snorkeled out to where we expected our anchors to be dug into the sea bed. We were able to find Jeff's but Eximius' was dug in so well that we could not see it. Jeff did give me some pointers on how to snorkel effectively, so I learned a new technique that did make snorkeling much more pleasant. During the snorkel, I had let go of a large plastic noodle and, once back at the boat, Peggy and Judy pointed out that the noodle was moving rapidly towards the horizon astern of us.
Chris was at our stern and quickly motored away in the direction of the noodle. By that time an arriving boat had spied the noodle and picked it up from the water. Chris was able to catch up with them and retrieve the noodle. Thanks Chris.
Of course, overnight, our two rafted boats swung at least 360º which created a bit of Macrame on our anchor chains. We spent a while discussing how to unwind the chains. First option was to try and use Affection's dinghy to to swing around the anchors in the opposite direction from the storms effect and thus release the knot in the chains. That just didn't work, despite our best effort. Next we tried to untie the knot by using Affection's engines to swing the boats around, again, didn't work. Finally we decided with myself and Chris aboard his dinghy, to pull up the chains and then Eximius' anchor allowing us to untangle the chains. That worked, but only because of a heroic effort by Chris. The water was only about nine feet deep and Chris dove several times to free our anchor but it worked. I feel that I owe Chris at least a Noodle.
With the anchors separated, we made the decision to just leave Affection's anchor holding both boats overnight. That worked for us as we planned to haul anchor before 8am Monday (Memorial Day), so now we could leave the raft up a lot easier.
The wind was to high for us to raise the dink on Sunday evening. Just after dawn on Monday, it had reduced sufficiently that we tried, successfully to hoist it out of the water. I had made a modification to the dink's painter ( a rope that is attached to the dingy to help control it when it's moving it around from outside the boat), the change involved putting a loop in the painter such that I could reach the loop from the deck of Eximius. That allowed the connection of the lower end of the utility hoist to the loop without having to reach below the water to attach the hoist to the bow eye of the dinghy.
With the hoist attached to the dink, we were able to easily hoist Special T up on deck, as soon as it cleared the lifelines, it swung in front of the mast and we could lower it down onto the foredeck. It went surprising well with very little effort. Special T - a Zar 9HDL dinghy weighs about 160lbs and the 4 to 1 ratio of the utility hoist meant we were pulling down on the hoist line with about a 40lb force, easily done when pulling in a downwards direction from the top block on the hoist. So we quickly secured the dinghy on deck and went below for breakfast.
Around 7am we had Eximius' engine running and the boat set for departing the raft up. Jeff appeared on the deck of Affection and quickly assisted in us casting off from his boat, we motored astern to clear the sides and then Veer around to the North West and head for our planned route up the ICW channel of Biscayne Bay towards the Featherbeds channel. We saw that Summer wind had left a while before us and was at least an hour ahead of us. We set the autopilot to follow the route back to the North end of Biscayne bay with the plan of deciding if we were going to go outside via Stiltsville or continue North on the ICW and head home via the ditch.
Peggy was not for us going outside. We had just gone through some heavy rain and could see the clouds dissipating on Radar, Summer Wind was already out on the Ocean and reported there was a slight swell and light winds about 45º off the Stbd bow, so it should be a nice comfortable ride home. In addition to being able to sail home, there was the advantage that we would not have to deal with all of the bridges between Miami and Port Everglades. For me the choice was obvious. The weather had improved and the Bay was nice and flat, we were sailing with just the Genoa out doing about 4 to 5 knots on under 1900 rpm of the engine, and with the wind 45º off the bow outside, it really should be a faster ride if we put out the Main sail as well. So I was for going outside. Peggy was not, quite adamantly so. Captain made the decision, we turned towards the channel entrance at Stiltsville. -- MISTAKE --
As we motored along the Stiltsville channel, following many other boats, both sailboats and power boats, the sea was very calm but I had furled in the Genoa and we had a very gentle journey to the Ocean, it was quite relaxing.
Once outside of the Channel, we started our slow turn North, my plan was to ride the gulf stream and reduce our trip time back to Port Everglades. We headed about 33ºM keeping an eye on our ground speed, looking for a knot or two lift to the North when we reach the gulf stream. That happened around Noon so at that time I turned North, we were outside of the route to Miami channel and so I put in the Port Everglades Outer buoy as the target destination. Skies were clear, not much wind but I put out the Genoa and we kept the diesel running, still below 2000rpm.
Well, that didn't last! We were about 7 nautical miles south of Port Everglades, wind started to pickup and I furled in the Genoa to just a handkerchief. We were motor sailing with the wind backing more to the North, Seas were starting to pickup. Peggy was not happy, that's putting it lightly. We normally wear our life jackets when on the Ocean, but at this point we put on our Tethers and, with Peggy below, I hooked my tether near the helm. The wind increased. Sorry, but our wind data was not working ( more on that in the next post), however, we received a VHF call from Summer Wind advising that the winds near the Port Everglades Entrance were sustained at 20knots and we knew it was gusting, but we were doing 6 - 7 knots through the water but only 4-5 knots overground despite the Northerly winds. I furled in the sail completely.
All of sudden, while dealing with the significant wave action and the gusting winds, our speed through the water dropped to 2knots! We're less than two miles off shore, waves wanted us to go that way and the wind was not steady North but gusts seemed to veer to the East.
I guessed we had picked up something on the Prop and instead of it pushing water astern of us thus moving us forwards, it's now probably just a ball spin with virtually no propulsion. I also noted that there was smoke or steam coming out of the exhaust. I slowed the engine to Idle speed, shifted to Neutral, then into reverse and revved up with the intent of dislodging anything on the prop. We've picked up Poly bags before, same feeling, same process so it might work this time too. But when I put the engine in reverse, Peggy could head a 'whomping' sound from inside the cabin and the engine shut down. Again, this not a good situation. I checked the raw water strainer first, it was not totally clogged with Sargassum but close. Cleaned that out. Then I checked the Raw Water thru hull, just a few seconds to release the hose clamps with the handy tool that I keep near to that thru hull, water squirted in and so that was clear. Time to try and restart the engine before I considered calling for a Tow Boat. When I tried to start, it didn't! Ok, maybe there's a problem with the start battery - I asked Peggy to switch the battery selector to 'Two' tried to start again, nothing! Grrrr. Ok one more time, switch the selector back to normal and let's try - DUH! - the engine was still in gear! I put it into neutral, tried to start it again and it instantly started without any issues. We're moving again!
Worried that the steam/smoke was another indication of a problem with the engine colling system, I keep the rpm below 1800 and we continued the bumpy ride up to Port Everglades.
We both agreed that we could anchor in Sunrise Bay for the Monday night and catch the High Tide Tuesday morning , so we anchored in the Bay.
Before we took a break, I pulled the engine covers off and started checking the engine. Coolant levels - OK, Raw Water impeller pump, OK, Oil OK, Drive belt OK, we're looking good. Clean up and take that well earned break.
We heard from Summer wind and Lady Gray that they had got back to their docks safely, things were looking better.
After a hot shower, we had Shepherds pie for dinner along with wine for Peggy, and a glass of rum on an Ice Ball for me.
We both slept well!
Tuesday morning we caught the 8:30am Sunrise Bridge opening, then the Las Olas Blvd bridge and turned up the New River.
The New River bridges are locked down from 7:30am to 9am and 4pm to 6:30pm weekdays for the rush hour traffic. Our arrival at 3rd Avenue bridge was timed so that we would get there just after 9am. Of course, it's never that easy, the FEC Railroad bridge went down before we got past the 'Tunnel' ( that the tunnel that allows US 1 to pass under the New River. ). I decided to stay downstream of 3rd avenue bridge rather than risk getting stuck between 3rd and Andrews Avenue bridges, the wind and current would not make that an easy place to hold station. On the other hand we were near the Tunnel, the River is quite wide there, and much easier to hold station. The bridge was down for about 20 -25 minutes. As soon as it was rising, we turned upstream and called 3rd avenue bridge for an opening. As we passed under 3rd, we could see there was a 70' motor vessel under tow between the two bridges. Good decision not to pass 3rd any earlier.
Once past 3rd avenue bridge, Andrews Ave bridge opened, the downstream heading vessels held back while the upstream vessels, and the Tow, cleared, then we turned and followed the Two through 7th avenue bridge, we then turned onto the North fork of the New River and headed back to our dock.
As always, it was a memorable trip. Thanks Jeff, Judy, Chris & Kellie, Barry & Jamie, we really enjoyed the trip, even the challenges. Looking forward to next year.
Of course, I would be totally remiss if I didn't acknowledge Peggy's better choice for the trip home.
We try to get the boat out to celebrate St. Patrick's Day each year, it's just another reason to get the boat out and it's always a fun weekend.
Tides demanded that we leave the dock around 10am on Friday, the weather was cooperating so it looked like we could actually 'Sail'. This would be the first chance we have had to put the sails up on the Ocean since we installed the new Auto Pilot (Link to that post).
Nothing special about our trip down the New River except for a note about the FEC Railroad bridge. We lined up with other boats Upstream of the Seventh Avenue Bridge. There was a Catamaran and another power boat in front of us. As soon as 7th opened, the power boat went through but the Catamaran dawdled, that's not the way to go through a busy road bridge. Road traffic is halted and the other boats in line are waiting. Worse was the fact that they didn't know how to use the radio and their communications with the bridge tenders was unintelligible, the only way we knew of their boat name was because we were directly astern of them, it was not clear on the radio. We all passed 7th bridge and the boats behind us were closing up to us due to the slow boat ahead of us. Now we hear that the FEC Railroad bridge is going down in Six minutes and the rate of progress of the Catamaran would put us behind the Railroad Bridge and that could mean hanging around for as much as an hour! I called the Catamaran on the radio but they did not respond. I called again, no reply. I could see someone on the flybridge of the Catamaran but could not tell if he was at the helm of if the boat was being helmed from the cabin. There was a woman moving between the Flybridge and the cabin. What radio transmissions we heard from the Catamaran were made by a female voice, but still no responses to my calls. Finally I pulled alongside their Port side and gave them a taste of my Navy 'AHOY! which, if you have heard me, it's not easy to ignore. The guy at the flybridge turned to look my way. At that time I was far enough forward to see a tow ahead by the Railbridge. I sped up and moved over to the south side of the river to let the tow pass on my port side. The Catamaran was still not responding to any calls from either myself or from the Tow boats. Grrrrrr!
We made it pass the FEC Railroad Bridge and Andrews Avenue as well as 3rd Avenue bridge opened and stayed open while we all passed. Guess what! Still no clear radio comms from the Catamaran.
As we headed down to Sand Bar park, the intersection of the ICW and the New River, we turned at Marker #5 towards the 17th Street Causeway Bridge, the Catamaran was well astern of us with Fenders still hanging from his Port Side Rail, I guessed the he was headed to the Lauderdale Marina just upstream from the 17th Causeway bridge. The bridge was open but due to close, there were no other sailboats astern of us except the Catamaran so I called the bridge and advised that we did not need the bridge to be open ( our mast clears the bridge when it's down, even at spring high tides, we have at least two feet clearance at the center of the bridge spans.
The 17th St. Bridge had been open quite a while, we heard the bridge tender call the 'Catamaran North of the bridge' asking if they intended to pass under the bridge, no reply, the tender called several times, again no reply. Finally, as the Catamaran was getting close to the bridge they replied to a desperate call from the bridge tender, we could still not make out the clear intentions of the folks on the Catamaran and they still did not communicate clearly despite speaking English.
Well enough of that fiasco. We turned around the corner of Port Everglades entrance and headed out to the Ocean. We saw the Catamaran turn on the wrong side of the channel marker. They were probably shallow draft and not restricted by the depths, however, being out of the channel meant they were in the exclusion zone, normally a vessel straying into the exclusion zone would get a visit from the port police, but they looked pretty busy. They turned out towards the Ocean, still hanging fenders.
Ok, we passed the 2nd Green Buoy of the entrance from Port Everglades and turned South East into wind and raised the Main ( we need to wash our main sail!) then, turning towards the North, we unfurled the Jib. We're sailing!
And now the good news!
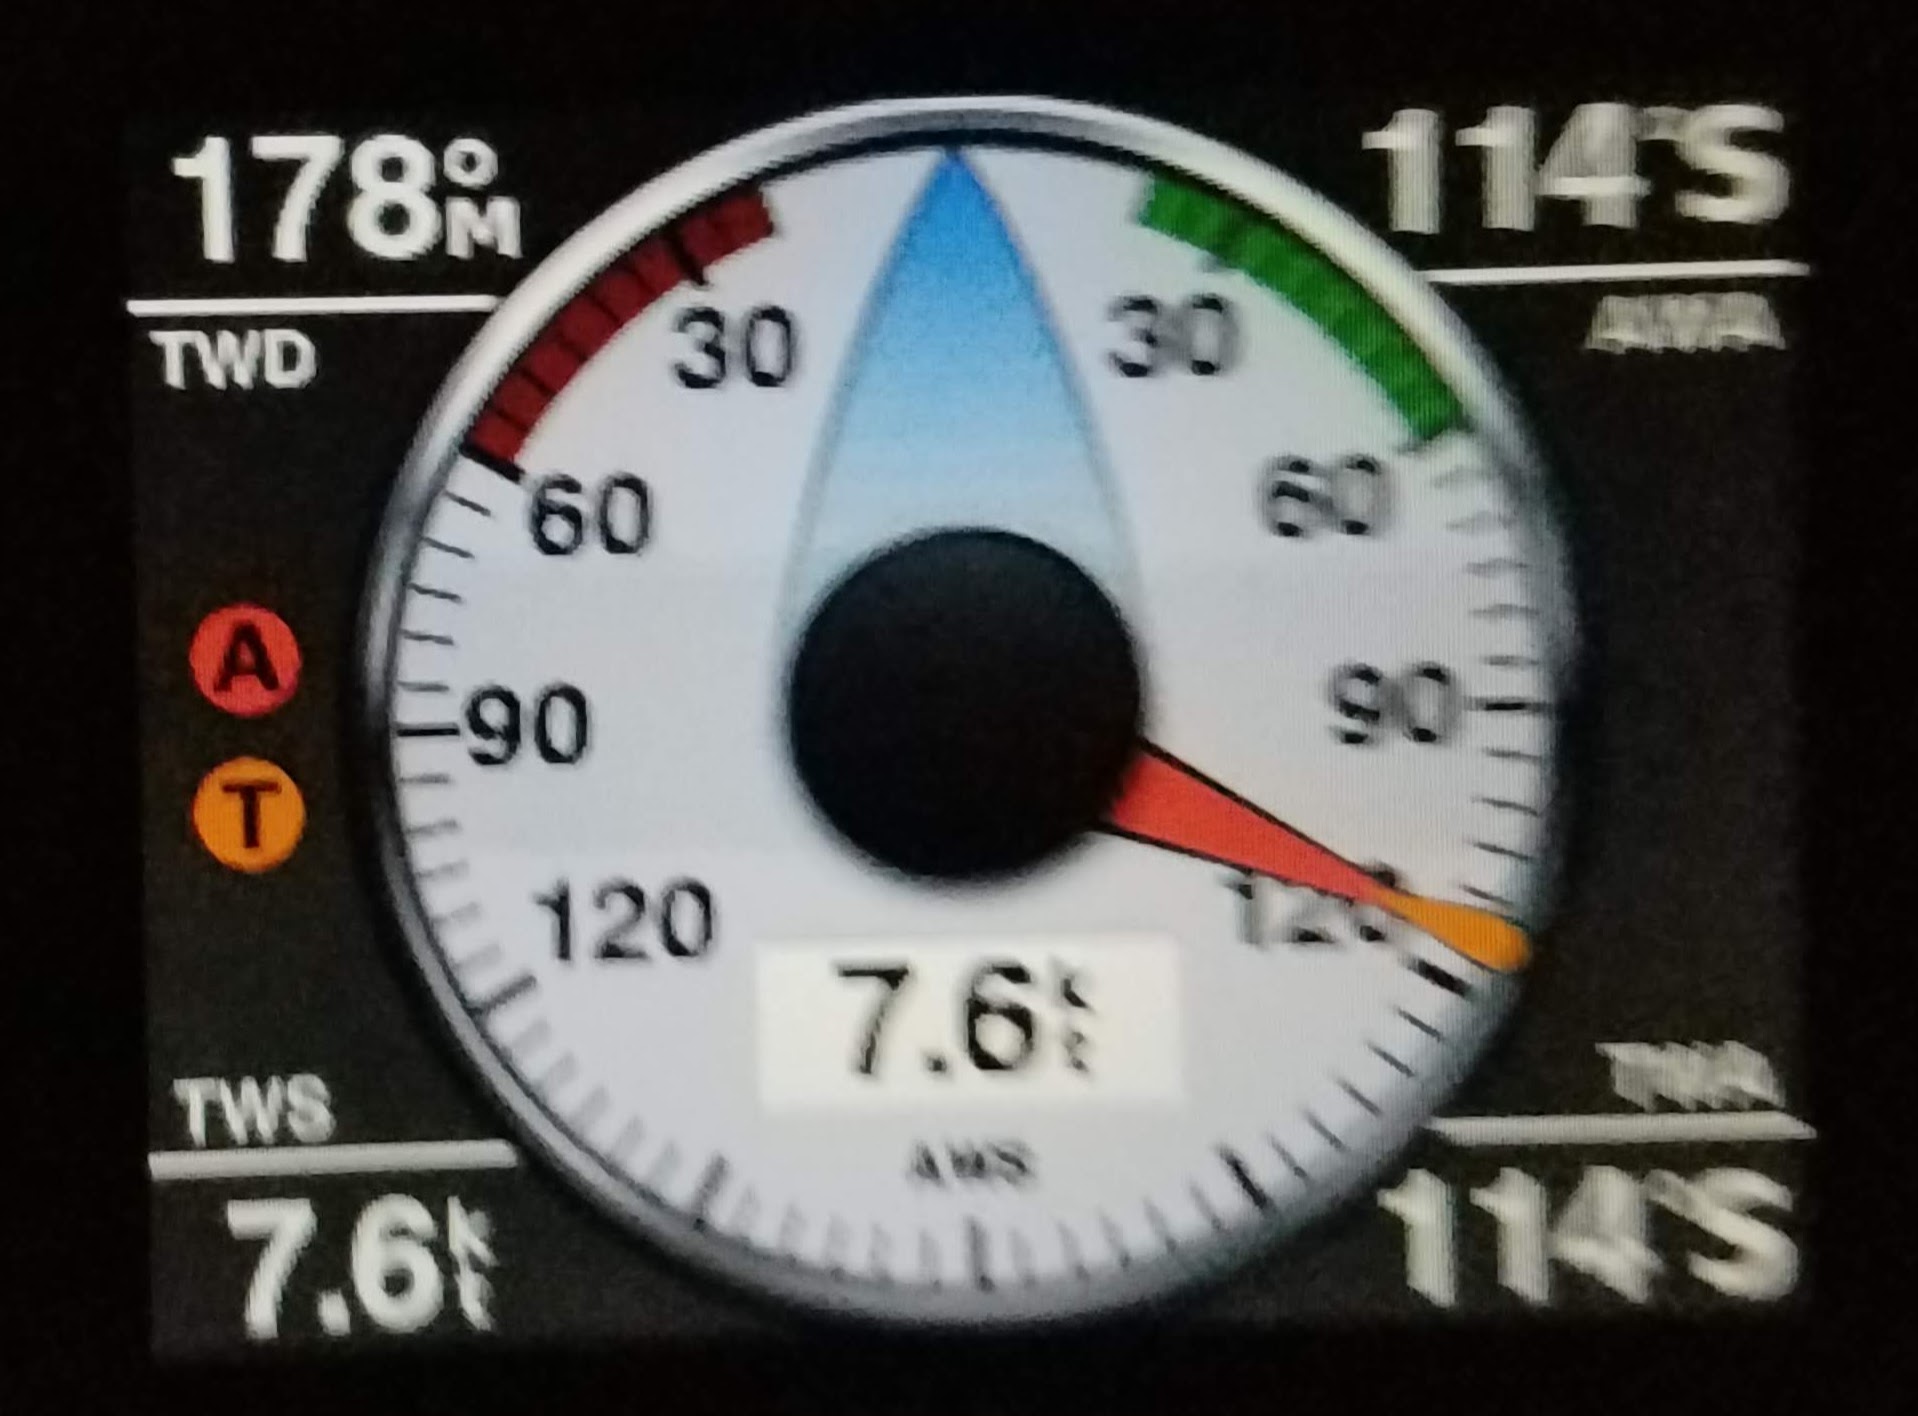
This (blurry) pic shows our Garmin Instrument displaying the wind data (at night) .
Note the big Black Dot in the center! It's Black, nothing there. We never thought about it being empty.
As mentioned, this was the first time we had taken the boat out on the Ocean since installing the new Auto Pilot.
We set the pilot to follow a track from Port Everglades up to Hillsboro Inlet.
After about 10 minutes, I just happened to notice this.
Look at the center of the display, it's showing Drift!
Normally we would look at the Chart plotter and subtract the Water speed from the COG speed and calculate the Speed of the water.
Don't have to do that anymore, in fact, not only does the display now show the Drift rate but it also shows the drift direction.
l can only assume that the display was enabled when we added the Heading unit of the new Auto Pilot.
Sorry, it's a geeky thing, but this is very cool. I'm looking forward to seeing how it displays the data when we're in the Gulfstream. WooHoo!
Ok, back to the sail. We sailed on Autopilot to within about a mile of the Hillsboro Inlet, turned into wind under power and lowered the sails. We motored into the inlet, the current was flowing hard and with the wind from the South East, it was wind over waves, that means - Bumpy! But we got into the inlet without any issues and then did a few doughnuts waiting for the bridge to open.
As we motored under the open Hillsboro Inlet Bridge, the Drift rate was 4.49knots on the nose (the triangular arrow in that center dot display shows the direction of the drift), that's a heavy flow and we were running the engine at just over 2,000 rpm. That was an exciting transit.
On the VHF Radio, we had heard Summer Wind call for the bridge before we were in range. Chris was taking the boat home from PlayBoy Marina where he had some bottom work done. We motored easily up towards Hillsboro Blvd Bridge, as we neared it, there was a Tug pushing a barge and the bridges open on demand for commercial vessels (like tugs and tows). The Hillsboro Bridge tender called us and advised that we could follow the tug through if we wished. So we snuck behind the tug and followed it all the way up to Lake Boca. And Lake Boca was already crowded despite it being early Friday afternoon.
We anchored near the North West corner of the lake because it was too crowded on the North East corner. That put us closer to the ICW and a little to close to the other anchored vessels (they looked like permanent residents) so we dropped a 6-1 rode thinking that we would move in the evening when the power boats all headed home.
They didn't. So we had to wait till the morning to move to the North East Corner, but when we did we had a prime anchoring position.
As the day wore on, Saturday turned into a great day to be on the Lake with a bunch of other club members and their boats. Mike Megarity on Spruce Goose, Mike Miceli on Loony-Poons, Chris and Kelli Whitlock on Summer Wind, Barry Simmons & Jamie Remacle on Lady Grey, Tom Garvey and Norma Glanz on Ohana, Mike & Brenda Duvall on Imagine, Jeff & Judy Keiser on Affection, Pierre & Osa Holstein on Sea View, Sea Dragon, Blythe Spirit, Bob & Joyce Tiger on Diversion, Eduardo & Eva Rabadan on Cookie Monster, Bill & Collen Stolberg on Duet, And of course, us on Eximius.
Of course, there were probably a couple of hundred other boats, large and small, it looked like there were a lot of people ready to enjoy the weekend.
One of our best stories was about a small power boat that tried to anchor about 20' off of our Stbd side. Sure it was too close, but we have learned to deal with that at Lake Boca. The number of boats in the lake at a weekend with good weather is crazy! So, this power boat dropped his anchor. Peggy & I were sat in our cockpit just enjoying the view, it was obvious that the power boat had not put out enough rode and he kept dragging and moving further North, basically along our stbd side. Then he pulled in some of the anchor line, it didn't help, so he threw out another anchor off his stbd side, now his boat swung at an angle to his first anchor and the boat was still drifting. I spoke to him (he was close enough to our boat to hold a conversation. ) and asked how much of his main anchor line he had out, he replied that he had 20' feet out at first but he was dragging so he pulled some in. Duh! I tried to tell him that in 9 feet of water and a bow roller about 3' above the waterline, meant that he should have 5 x 12' or 60' of rode.
He explained that he had done a boaters safety course and that he should have 50' of anchor line for a 20' boat. I was about to give up and just watch him drift further to the North where there were other boats anchored (and not dragging). His female guest/wife on the Bow said something to him and the next thing we know is that he has pulled up both anchors and was heading out of the lake and up towards Palmetto Park Bridge. Good plan!
At 6pm, Chris stopped by our boat to give us a ride over to the Hosts on Loony Poons, There were quite a few folks already aboard and soon that number increase enough to flow over to Summer Wind.
After a few drinks, the food was attacked, there were a couple of serious Shepherds Pies and plenty of other food, there always is at our club events.
Jokes, Limericks, Songs and a good time by all, by dark we headed back to our boats, the boat stories flowed along with our drinks, we even covered some club business.
During the early morning we were awakened by the noise of an anchor chain being pulled up or lowered. Quickly out on deck, we could see the host boats raft up were moving South, deliberately. They were being quite well behaved which was surprising because it was dark, hand signals didn't work, and we could only hear 'Forward!' or 'Reverse' and 'Neutral' which we guessed were the commands to whoever was at the helms of the three boats. Come the morning the host boats dinghy'd over to our raft up and explained what had happened. You probably guessed, some of the boats were too close and when the current changed around, that turned into a gentle bump or more. Well done the skippers and crew of those three boats, and one being a catamaran.
Sunday morning breakfast and it was then time to separate from the other two boats in our raftup and head homeward. For Cookie Monster, that was a move of about 150' for us it was a motor all the way down to Sunrise Bay, we reached every bridge on time, didn't have to wait for any of them, so it was a reasonably quick trip down the ditch.
Of course, Sunrise bay was packed with Party Boats, but we found a decent spot to anchor and guessed that most of the Party boats would leave the bay by 6pm. They did, and we had a quiet night at anchor.
Monday morning we left Sunrise Bay and headed down the ICW towards 17th Street Causeway Bridge and then a sharp turn Starboard down 15th Street for a Pump out, it's the second time we have used that facility, it's great, the Pump is not particularly strong, but it gets the job done.
Once pumped out, we headed out of the canal and turned to Port and back towards the New River turn off at Sand Bar Park. We had a minor incident as we held between 3rd Avenue Bridge and Andrews Avenue bridge. There was a Tow in front of us which meant there was not a lot of space between the two bridges. In retrospect, I should have turned the boat downstream which would have put us with the current on the boat and the wind on the bow. With strong forces dictating our movements, at one point we touched a fender of a boat on our Stbd side. No harm done except to my pride. We probably held station for about 10 to 15 minutes, that's stressful. If we had a full keel it would have been virtually impossible unless we had a Bow Thurster - we don't. Once past Andrews Avenue Bridge, I turned the boat to face the current and wind and we easily held station while waiting for the FEC Railroad bridge to open. Then it was turn again and head up river to the fork and the up the North Fork of the New River to our dock.
Back at the dock, Peggy made a snack for us as unloaded the boat and rinsed it down, especially the anchor chain, it had a lot of use this weekend.
I'm normally pretty easy on reviews of boat equipment, but I have to step it up with my review of the Raymarine EV100 Autopilot that we installed this year.
I planned the install in great detail as it was an expensive and complex install due to the existing wiring on the boat.
The old Autopilot was suffering, turns out it was probably due to bad wiring of the original install whenever that was done, before my time owning the boat.
The install was done in the summertime here in South Florida - yes - Sweaty work.
All of the existing navigation equipment was rewired.
After finishing the install a few months ago, we did a dockside test with the boat tied fast to the dock.
That basically consisted of calibrating the Wheel rotation. Once complete we set the wheel pilot to Auto and then adjusted the heading to see that the wheel turned in the correct direction, a simple test, but it sure gives a greater degree of confidence in the complete installation.
Ok, fast forward to the New Year's Eve Cruise on December 30th 2021. We left the dock at 6:15am dawn was just breaking, we navigated down the New River and passed all of the bridges, the last being the 3rd Avenue Bridge, from there is was simple motoring down the river then North on the Intracoastal Waterway, there were only two bridges we need to pass to get us from the River to Sunrise Bay.
I took the opportunity to turn on the Autopilot once we passed the last bridge on the New River. Initially the controller complained that there was no drive unit found, turned out that the Autopilot was not powered on, but the instrument was via the NEMA 2000 Network. Peggy turned on the Autopilot at the Electrical control panel by the Nav Table in the Cabin.
Now the Autopilot started to obey the commands at the Helm Station. There are 4 heading control buttons:- -1º +1º, -10º, +10º. As soon as the Autopilot was put into Auto mode, the wheel drive motor took control of the Helm. Pressing any of the heading control buttons changed the heading very quickly, it was a quick as if I had manually tried to change the heading by rotating the Helm. I must admit, I was impressed! I was able to navigate all the way from 3rd Avenue bridge to the Las Olas Blvd Bridge - there I took the pilot out of Auto and manually steered through the bridge where the current was pretty heavy and there was other boat traffic the really required manual control.
Again, when we passed the Sunrise Blvd Bridge, I went back to manual operation. After the last bridge, Peggy took the helm with the Autopilot in Standby.
The old Autopilot would very slowly react to a heading change request and would often just stop steering, it was not reliable. We tried to steer via the Autopilot but had to keep a close eye because it deviated from the desired heading every few minutes. The Helm wheel would move with exaggerated turns and confidence in the Autopilot system was zero.
The new Autopilot is amazing so far! It responds immediately to a heading change request and does not make exaggerated wheel movements, in fact they are quite fine movements. We have had other people sail on Eximius, and they would not make such fine movements of the wheel despite instructions on how to hold the wheel and make small but early trims of the wheel to keep on course.
Beneath the digital heading display on the Control Instrument, there is a text bar that indicates when the system is detecting local magnetics, every now and then it would change color but it pretty much stayed visible on the first day of use.
After a great New Year's Eve cruise with the Hillsboro Inlet Sailing Club, we left Sunrise Bay at 7:15 Sunday Jan 2nd 2022. Once past the Sunrise Bridge, we put the Autopilot to work again and easily navigated to Las Olas Blvd Bridge, manually steered past the raised bridge and then back into Auto.
As we continued up the New River, we heard from the FEC Railroad bridge that it was going down in 6 minutes. I called the bridge tender asked how long he expected the bridge to be down. 14 minutes.
At the rate we were travelling though the flooding river, we would be at the FEC bridge before it opened. So I decided to do a few Doughnuts downstream of the 'Tunnel' to pass some time in order that we don't end up trying to hover back from the approaching bridges. I probably made 5 or 6 doughnuts, just turning to Stbd by adjusting the heading via the Control instrument.
During this maneuver the Control Instrument display changed completely. It displayed a message stating that the system had completed the Magnetic evaluation. WooHoo.
After accepting that info (OK) the screen returned to the normal display and the Detecting Magnetics notice was no longer visible.
We have yet to complete the Commissioning process and that requires that we are in an area that is free of obstructions (like the sides of the New River!) as we have to let the Autopilot take charge.
The Autopilot has a learning curve (the pilot, not me!) and during one phase of the commissioning process the Autopilot follows a track similar to the one shown here. We'll have to be on the Ocean to do that, it's far too crowded on the New River and ICW and the lakes are not big enough as well as normally being occupied by many boats.
I'm good with this, another reason for getting the boat out.
So far, my impression of the EV-100 is Excellent! Easy to use, Very Responsive and very conservative in the way it manages the steering. We have a lot to learn about the system after completing the Commissioning including being able to follow a track (not sure if it will do that, but it has the systems required, just have to make sure that the Raymarine part will listen to the Garmin GPS Chartplotter which provides the data for following a track.)
Right now, I give it a **********, 10 out of 10 stars. I am delighted with the upgrade. Well worth the effort and we both look forward to using it often.
Oh! One last thing!
Prior to installing the new Autopilot (which includes a Rudder Position Sensor) we had to look down between our legs to see which way the Rudder cap was pointed in order to determine the Rudder Position. It was almost comical, Peggy would be at the helm, I would ask her to go Amidships and she would look down between her legs and turn the wheel till the rudder cap pointed directly forwards.
The New Autopilot has a Rudder Position Display, even if the Drive it not powered up.
The display shows a Red (port) or Green (starboard) block from 0º to current rudder position.
No more looking between our legs to see the Rudder position. BTW this was only necessary because the wheel required more than 1 turn to move the rudder from fully to port to fully to starboard, so the whipping that we have on the wheel to indicate Amidships is only useful if the rudder it nearly Amidships already.
Stay tuned for more updates as we complete the Commissioning process and get used to using this awesome upgrade to Eximius.
Our existing Autopilot was badly wired when installed before we purchased the boat Six years ago. Now that we're replacing the Autopilot with a new Raymarine EV-100 system, we're making sure that the power supply is up to spec, all of the other cables are new.
The Autopilot Control Unit (ACU-100), the Electronics and Wheel drive motor of the system, requires 7amps 12v DC power. Separately, the new Raymarine SeaTalkng network Backbone requires 3 to 5 amps.
The Electrical Control panel on Eximius is planned to be rewired later this year but we'll take any opportunity to upgrade the electrical system before then.
The Electrical Control panel has a 15amp breaker for the Autopilot. With a total of a max of 7amps, I'll replace existing 15amp breaker with a 10amp breaker.
The existing wire from the breaker to the Autopilot is #16 and the round trip distance is about 30 to 40 feet. The Correct wire size for 7 amps along that length of wire is #10.
Of course, the probability is that the -ve cable to the old Autopilot is also a #16 so that will have to be changed out for a #10 also. I installed a -ve Bus Bar adjacent to the engine a couple of years ago, however, the planned upgrade to the Electrical panel includes having new -ve bus bars inside of the electrical panel housing. There is a -ve bus bar in that area, but it's just not suitable - and has far to many wires terminated at the bus bar. I'll install a temporary -ve Bus Bar near the panel.
So, we're going to pull two Red #10 (+ve) and a Yellow #10 (-ve) wires from behind the Electrical panel, aft into the Bathroom, aft again into the area behind the aft berth stern bulkhead then to the ACU area along with all of the other wires from the Navigation system (GPS, NEMA2000, Radar, and VHF, Echo Depth Instrument).
In an earlier post I covered the rewiring of the instruments at the Helm Nav Shelf, so all of the instrument cables now exit from the deck down into the aft berth.
The existing electronics requires 2 fused connections supplied via the Aux GPS Circuit Breaker. Another two fused connections to be supplied via the Autopilot Circuit Breaker.
I have just ordered a second fuse block (see below) in order to provide a neat install of all four of those connections.
These blocks have a transparent cover and have 4 individually fused connections, however, I expect that only two of each will be required.
There will be a seperate Terminal block for the -ve connections.
Those fuse blocks will be mounted on the Aft Bulkhead close to the ACU.
RANT Time!
Ok, I understand that electronics manufacturers need to make the cables long enough to suite a wide variety of installations, so the cables can be quite a bit longer than required. HOWEVER - they should have a note on the installation instructions suggesting that the cables should be trimmed to a length suitable for the installation. I've seen so many installs of Boat Electronics where the installer has coiled up the wires and left them loafing about somewhere behind the various panels on the boat. Today I pulled out 6 cables each one at least 15' long that could have been as short as 5' Grrrrr! I spent over an hour figuring out which cables were no longer required and could be removed in their entirety. At least I got them all out. But then I started on replacing the power wires for both the Garmin Echo depth finder and the Garmin GPS - I knew they were bad, but had no idea how bad! Tomorrow I'll work on replacing those cables.
RANT Off!
During a conversation with the Raymaine Tech support, I learned that there should only be a single power connection to the SeaTalkng Network backbone. My plan was to add 12v DC to that backbone. However, as they also clarified that the SeaTalkng backbone is basically identical in function to the NEMA 2000 backbone and that if they are going to be connected it should be via a SeaTalkng to NEMA 2000 (which Raymarine refer to as 'Device net') via a backbone connection and not a spur connection. That means that the 12v DC that is already provided for the NMEA 2000 network will also power the SeaTalkng backbone. One less power supply to worry about. That means that the 2nd Fuse block noted above will only provide power to the ACU-100 and not to the SeaTalkng backbone.
Down at the boat yesterday, I was able to remove a few unwanted cables (because they went nowhere and had no power on them). It required that I remove the Aft Bulkhead in the Aft Cabin, not too difficult. The port side bulkhead of the Aft Cabin also came out just to allow more access.
It will take a bit of effort to sort out the remaining cables. The Data cable from the Radar Unit cannot be cut and has about 30' of excess cable. Probably because the Radar Dome has the option to be mounted up the mast.
The bare wire connections that have to be made to the ACU-100 are the type I try to avoid, but there's no getting around it on this device. However, I can terminate the bare wire ends with Ferrules.
The ends of the bare wires that extend beyond the ferrules will be cut off. That leaves a nice and strong termination to clamp down with the Screw in wire holders of the ACU-100
Those ferrules will be used on the bare wire ends of connections for the SeaTalkng Spur cable, the Wheel Motor Power, the Rudder Position Sensor and the Power cables.
Some of those wires are just 24awg, imagine how fragile they would be if the bare wire ends were simply inserted and screwed down into place. The kit was cheap from Amazon, worth every penny.
The old power cable for the old Autopilot is a two wire sleeved cable at the Autopilot end, but the other end is not sleeved and is not the same cable. So that whole wire has to come out as mentioned above. Sadly, the cable passes from behind that aft panel in the Aft Cabin up to the side of the Port side Cockpit locker - that means the locker has to be emptied - it's crammed! Probability is that I'll find a join in the cable that is slavered in liquid tape - I really really detest that stuff.
Anyway, while getting this part of the project done, Peggy found another leak in the cockpit, she was scrubbing it down after all the groty work I did earlier this week. The to Aft Cabin port lights are leaking. Another project, but for now I have applied Butyl Tape to where the outside port light flange attaches to the side of the cockpit seating. Another post for that.
At this point we're ready to run the power cables, 30 mins to empty the port side cockpit locker, another 30 to pull the old cable out (and the other defunct cables), same again to the the cables all the way from the 12v Control panel. Replacement should be quicker as there'll be room in the loom cable ties for the new cables after pulling out all of the old cables.
That's Monday's job.
This project does seem to be taking a whole lot longer than expected, what's unusual about that, but we are spending time getting rid of the failed equipment and wiring. If we were installing this from scratch it would take a fraction of this time. Oh well! Boat projects tend to do that.
Update: Here's the schematic modified after talking with Raymarine Support
Had to take a break on this as we found a couple of leaky leaky bits around the cockpit to aft cabin windows, that lost us two days.
Back on task, I removed the wooden bulkhead between the aft berth and the fuel tank in addition to the bulkhead between the aft berth and the water tank, all in order to get access to the jumble of wires that are behind those panels. So far I have pulled out another 40' of poor quality wire, bad connections and wrong sized wires. By Saturday we had the wires pulled all the way into the main salon, just a couple more feet to go in order to get them out from the tangle of wiring behind the electrical panel. See the pic at the top of this post.
It's Labor Day Weekend, so we're doing family stuff until Tuesday, plus I'll get a bit of Canvas work done to bring in some boat bucks. Plan is to head down to the boat on Tuesday morning with the hope of running the new wiring from the circuit breakers to the fuse blocks close to the ACU and the GPS/Echo instruments.
Just in case you're wondering! Yes, we're ready to get the boat out as soon as this work is done! Working on the boat is fun and fulfilling, but we need water under the keel time.
Update Thursday Sept. 9th.
Down at the boat yesterday. Peggy spent most of the morning scrubbing down the deck, it's a constant challenge. With the power cables ran from the Cabin thru to the After berth, I was able to sort out the mess of wiring above the aft water tank. While at it (yep, another bit of project creep) I pulled the wire for the Echo Depth finder's transponder from it's old route into a much shorter and neater route which allowed for the additional wire to be coiled up neatly. Here's a pic of the current state of the wiring behind the aft bulkhead.
NEW PIC HERE
Sadly I could not find the adapter cable I had purchased from Amazon that joins the NEMA 2000 backbone to the SeaTalkng backbone - we spent way too much time searching for it. A new cable should arrive Friday. Saturday we'll go down to the boat and should complete the wiring at the Aft bulkhead, connecting the ACU and the Backbones. That should leave just a few more steps.
Replace the Wheel Pilot with the new one.
Complete the cable management of the wiring from the aft berth all the way to the main cabin.
Connect the Positives (Red #10) to the two circuit breakers
Connect the two Negatives (Yellow #10) to the -ne Bus bar at the back of the electrical control panel.
Test everything before doing the sea trials.
Well, Saturday was a huge success. I completed the looming of the cables in the Port Side Cockpit locker, removing about 30 old zip ties that were really not doing anything. Then completed the wiring in the aft berth, that's the cables going to the ACU, the SeaTalkng backbone connection to the NEMA 2000 backbone. Installed the Negative terminal block and connected the -ve from the ACU power connection, the -ve from the Echo depth instrument and the -ve from the GPS power connection. Then the +ves to the two fuse blocks - 1 for the ACU and the other for the GPS & Echo Depth. Ran the ground wire from the ACU to the fuel tank grounding tag (the fuel tank is grounded to the engine) Basically got all of the wiring in the aft berth complete.
So the plan on Tuesday is to go down to the boat and run the wires from their entrance into the cabin (that's inside the sliding door cabinet above the Nav Station) and connect +v's and -v's as mentioned above, at that point we should be able to test the electronics. WooHoo!
Of course, life gets in the way! On monday the roofing company is due to arrive at our home to start work on replacing the roof and Facia. We're in Florida, so that work needs a bit of personal supervision, the last company we used 20 years ago did a carp job and had to re-do some of it due to failing an inspection. Now I know what to look for - and I'll be looking!
We may get the boat out in a week or so, won't that be sweet!
Replacing the Coolant Hose on our Universal M25-xp Diesel Engine
The short hose from the Coolant tank to the Thermostat housing appears to be breaking down near the thermostat housing. At first I thought it was corrosion of the housing but then realized it's more likely the hose is deteriorating near the hose clamp.
Talking online with buddies on the C34 forum, they confirmed it would be ok to replace the hose with a Silicone hose.
Found one on Amazon and placed the order. It arrived on time and I just needed to spend a bit of time getting the old hose off.
After removing the hose clamps, I used a steel bent point to pull the hose away from the housing and from the coolant tank, only took a few minutes
Cleaned up the housing (Aluminium) and the tank connection (copper) and it was time to replace the hose.
The new hose has an Elbow, so no need to try and curve it but simply cut the ends to length.
I didn't have any of the non-perforated type of hose clamps handy (not sure where they are right now) So I used the original clamps.
The new hose looks to be a good replacement. We won't be running the engine for at least a week while I complete the Autopilot upgrade project. But I will replace the clamps and then run the engine to ensure there's no leaks.
An easy job. Then it will be time to clean the engine and give it a fresh coat of engine paint.
This is the new EV-1 Sensor Core, part of the Raymarine EV-100 Autopilot kit we're using to replace our existing Raymarine Autopilot - if you have read the previous posts, you know, the old unit is suffering from Alzheimer's - It doesn't know where it's going and keeps on forgetting things.
This is the old Autopilot's Compass unit. It's mounted on the bulkhead with the door to the Aft Berth, the new unit will not fit there.
The new unit has to be at least 1m (3'3") from the engine, other electronics or magnetic interferances.
Also, the top of the sensor puck has an LED that should be visible and is only visible from the top of the sensor puck, so the new sensor has to be about 12" from a deckhead (ceiling) and that really limits it's location on Eximius. We have a couple of meters long SeaTalkng cable to facilitate positioning the sensor from the ACU. In response from Raymarine, the EV-1 has to be a minimum of 1m from the ACU. We're working on that location issue.
Finally figured out the location for the EV-1 sensor.
That is on the bulkhead between the Galley and the Aft Berth Starboard side.
The Raymarine Spur Cable is connected to a SeaTalkng Backbone via a 400mm spur cable. The backbone cable connects to a T-piece has a terminator on one end and a backbone cable on the other.
The backbone cable is secured to the existing wiring loom above the soffit under the deckhead (behind the teak piece)
I spoke with Raymarine support this morning and a really helpful guy confirmed that I should not connect the NEMA2000 to the SeaTalkng network via a spur cable, but via a backbone connection cable.
This change eliminates the 5 way backbone connector and replaces it with a single T-piece connector.
The result is a more simplistic schematic but it adds about $150 to the project. I should be able to return the unused SeaTalkng to Device net Spur cable and I'll have to sell the additional equipment on Craig's list or E-Bay.
On yesterday's visit to the boat, I did get the cable for the Rudder Position Sensor secured to existing looms all the way to the ACU and a few of the other cables setup for install. Definitely making progress. The new connectors will not arrive until Friday next week, but I have plenty to get done before then. It does look as though the install will not be done in time for Labor Day weekend, we'll see how it goes. I could get everything else done before the last few bits arrive, so maybe we could sail that weekend.